Add or edit a weather source for an incident or element (type)
By default, live weather data is supplied to FH Mobile Response Premium through a meteorological station, or over the Internet from National Oceanic and Atmospheric Administration (NOAA) or automatic weather station (AWS) weather stations.
You can also add or edit additional weather sources from:
- A portable meteorological (MET) weather station attached directly to the mobile computer to determine weather conditions at the incident scene.
- Snapshots of weather data taken at different times while the incident is in progress.
- Manually entered weather data.
- Published weather information from another FH Mobile Response client computer, for sharing among clients connecting to the incident through a server.
Note: You must have purchased FH Mobile Response Premium to use weather information. While the options for selecting a default weather source appear in FH Mobile Response Basic, weather information is not displayed, and the selection is not used for weather-related calculations in FH Mobile Response Basic.
- (If an incident is not already open) Open an incident, as described in Open an incident.
-
On the incident's Summary tab, under Weather, click the gear (settings) icon
 on the right side of the box.
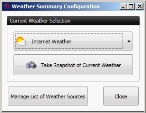
 The Weather Summary Configuration dialog box appears.
-
In the Weather Summary Configuration dialog box, do any of the following to add a weather source,
 Capture a snapshot of the current weather.
If you decide to change the source of weather information for this incident, any snapshots of weather data you capture become available as weather source options.
-
Do one of the following.
- Click Take Snapshot of Current Weather.
- Click Manage List of Weather Sources.
Regardless of which you click, the Weather Source List Manager dialog box appears.
If you clicked Take Snapshot of Current Weather, in the left pane, under Customizable Weather, a new listing for the current weather appears automatically at the bottom of the list and is selected.
-
(If you clicked Manage List of Weather Sources) In the lower corner of the dialog box, click Add Custom Snapshot.
In the left pane, under Customizable Weather, a new listing for the current weather appears at the bottom of the list and is selected.
- (If necessary) In the right pane of the dialog box, edit the values in Name, Wind Dir, Wind Speed, Air Temp, Humidity, and Cloud Cover for the selected snapshot.
-
Click OK.
The snapshot becomes a weather source you can select later for the incident.
 Manually enter new or edit existing weather data.
-
Do one of the following.
- From the top button in the dialog box, select User Custom Weather.
- Click Manage List of Weather Sources.
Regardless of which you click, the Weather Source List Manager dialog box appears.
-
(If you clicked Manage List of Weather Sources) In the left pane, select User Custom Weather.
The fields in the right pane become blank, so that you can enter your own data in them.
- In the right pane of the dialog box, enter values in Name, Wind Dir, Wind Speed, Air Temp, Humidity, and Cloud Cover.
-
Click OK.
The values you entered form a weather source you can select later for the incident.
-
Select the weather source for an incident or element (type)
Publish and unpublish weather information for an incident or element (type)
Set and clear weather data as default for an incident or element (type)

