Create, update, and submit draft transfers
You can create a draft transfer for a location that needs to increase supplies, return expired items, or reduce oversupply for specific items. Transfers with a Draft status have not yet been submitted for fulfillment to another location.
-
(If you have not done so already) Access the Transfers features in the Inventory module, select the location you want to work with, and manage the amount of data on the page, as described in Transfer items between locations.
-
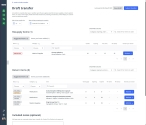
(If it is not selected by default) In the Transfers pane, click Draft.
The table on the page updates to display the draft transfers submitted by that location, to another location for fulfillment.
-
Depending on whether you want to create or update an existing transfer, do one of the following.
To do this Do this Create a new transfer
-
In the upper right corner of the page, click Create a new transfer.
Update an existing transfer
-
On the right end of the row for the transfer you want to work with, click View.
Depending on your choice, either the Create new transfer or Draft transfer page appears.
Note: These pages are nearly identical. On the Create new transfer page, Step 1, Step 2, and Step 3 headings appear at key locations on the page to guide you through the creation process. While these headings do not appear on the Draft transfer page, all the other fields and options do.
On both pages, the station you had selected earlier in the Viewing menu is automatically selected for Who is the transfer for. Under Items list, the Suggested items tab is automatically selected, and the table that appears on the tab lists the items that have fallen below par or expired through usage or expiration, the items that are oversupplied and could be transferred to other locations, and the items that have expired and which need to be transferred to a location that can dispose of them appropriately.
Note: If you had saved a draft for a transfer earlier, then selected the same station in the Who will be processing the transfer field and clicked Create a new transfer, the Inventory module reopens the existing draft instead of starting a new blank transfer, so that you do not accidentally send duplicate transfers to the same location.
-
-
(If necessary) For Who is the transfer for, change the name of the location that you want to transfer items to for resupply, or transfer items from that are oversupplied or expired.
-
(If necessary) For Who will be processing the transfer, choose the name of the location that will process the transfer, fill the requested items, and receive oversupplied or expired items.
-
 Build the list of items to include in the transfer.
The Inventory module tracks the inventory used by every location your agency manages, and when it detects items that fall below par, are expiring soon or have expired, or are oversupplied, the module automatically adds them to a list of items suggested for transferring from or to another location. You can also add to the list of suggested items, if you anticipate a need for specific items for an upcoming event or predicted natural disaster.
Par levels were defined by your Inventory module administrator when the module was originally configured, and can be changed in the Settings section of the Inventory module.
Information on changing par levels is available in Change item min and max par levels.
-
 (Optional) Manage the amount of data displayed on the Create new transfer or Draft transfer page.
You can search for items to add to the transfer, search individual columns, sort and filter column contents, hide and display columns, and so forth.
-
Depending on what data you want to view on the page, do one or more of the following.
 Search the inventory list for items not already added to the transfer.
You can search the entire list for a specific combination of characters, regardless of what column the data appears in. The search includes only items not already added to the transfer.
-
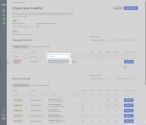
Above the list of items, on the right side, in the Search for items to add field, type the combination of characters you want to search the inventory for, and select an option from the menu that appears.
As you type each character, the list of options in the menu reduces to only those whose names or values contain that combination of characters.
Example: If you typed the characters
acet, the list of menu options reduces to display only the items whose names or values contain these characters, and which have not been added to the Items list table.
 Search within a table column for a character combination.
You can also search within a column, to find items already added to the table, which contain a specific combination of characters.
-
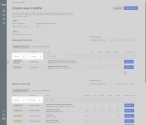
At the top of the column you want to search, in Search, type the combination of characters you want to search the entire list for.
As you type each character, the list of items in the column reduces to only those whose names or values contain that combination of characters.
Example: In the Item column, if you typed the characters
cart, the entire list reduces to display only the items that contain these characters in the medical supply name.
 Sort the table into ascending or descending order, based on the values in a column.
-
At the top of all the columns, click the column sort (
 ) icon.
 The ascending values (
 ) icon appears and the column sorts from A–Z, or from 1 to the highest numerical value.
 -
Click the ascending values icon to sort the list into descending order.
The descending values (
 ) icon appears and the column sorts from Z–A, or from the highest numerical value to 1.
 Hide or display entire columns.
You can decide which columns of data you want to display on the page and which columns you do not need, and hide the unnecessary columns. You can also redisplay any columns you hid in past.
-
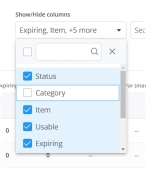
Above the list of items, on the right side, click the Show/Hide columns menu.
-
(Optional) In the blank (search) field at the top of the menu, type the combination of characters you want to search the entire list for.
As you type each character, the list of options in the menu reduces to only those whose names contain that combination of characters.
Example: If you typed the characters
Or, the list reduces to only the options that contain those characters. -
In the menu, select the check boxes for columns you want to display on the page, and clear the check boxes for columns you want to hide.
Only the columns you selected remain visible on the page.
Example: If your agency decides it does not need to know at a glance what category an item belongs to, you do not need to display the Category column on the page. If you clear the check box for the Category option in the menu, the Category column disappears from the page.
-
-
-
 Work with items suggested for transfer by the Inventory module.
-
On the Suggested items tab, on the right end of the row for the item you want to work with, click Actions.
The Add to new transfer dialog box appears, with the Restock more bookmark selected in the left pane. In the right pane, the item name, and the number of usable, unusable, min, and max par currently available for the item at the location that will send the item.
-
Depending on what kind of transfer you want to perform, do any of the following.
 Restock the item.
The Inventory module automatically populates the Location inventory will be restocked from field with the value you chose earlier.
-
In the right pane, in How many, type the number of the item you want to transfer from the providing location to the requesting location.
The Add items (number) to transfer button updates to confirm the number of items you specified to transfer
-
For Location/Sublocation, choose the menu option corresponding to where in the hospital, agency, or unit the new items will be stored.
Options in this menu are based on the sublocations defined by your Inventory module administrator when they initially configured the Inventory module.
Information on defining sublocations is available in Manage locations and sublocations.
-
(If you want to divide the item received up among multiple locations) Click Add another sublocation.
Example: You will restock 10 boxes of airway adhesive, and you want to stock five boxes in an ambulance, and the other five in a hospital store room.
A new row appears in the table.
-
Repeat the previous steps to specify the quantity of items you will stock in the additional location, and location/sublocation you will stock it in.
-
(If necessary) Click Remove to delete a row in the quantity and location table.
The Inventory module removes the row from the table.
-
Repeat the previous steps as many times as needed to divide the item you are restocking in different locations.
-
Click Add items (number) to transfer.
A small green circle with a check mark and a confirmation message appears in the right pane.
 Return items that will expire soon.
-
On the left, click the Return expiring bookmark.
The right pane updates to display fields for returning some quantity of the soon-to-expire item. The Inventory module automatically populates the Return number to field, and you can not change it in the dialog box.
-
For each row in the table, in the Return column, type the number for the quantity of the item you want to return.
The Add items (number) to transfer button updates to confirm the number of items you specified to transfer
-
Click Add items (number) to transfer.
A small green circle with a check mark and a confirmation message appears in the right pane.
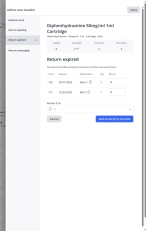
 Return items that have already expired.
-
On the left, click the Return expired bookmark.
The right pane updates to display fields for returning some quantity of the item that has already expired. The Inventory module automatically populates the Return number to field, and you can not change it in the dialog box.
-
For each row in the table, in the Return column, type the number for the quantity of the item you want to return.
The Add items (number) to transfer button updates to confirm the number of items you specified to transfer
-
Click Add items (number) to transfer.
A small green circle with a check mark and a confirmation message appears in the right pane.
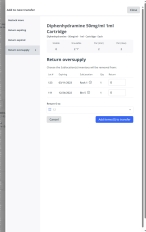
 Return oversupplied items.
-
On the left, click the Return oversupply bookmark.
The right pane updates to display fields for returning some quantity of the overstocked item. The Inventory module automatically populates the Return number to field, and you can not change it in the dialog box.
-
For each row in the table, in the Return column, type the number for the quantity of the item you want to return.
The Add items (number) to transfer button updates to confirm the number of items you specified to transfer
-
Click Add items (number) to transfer.
A small green circle with a check mark and a confirmation message appears in the right pane.
-
-
In the upper right corner of the dialog box, click Close.
A confirmation message appears in the upper right corner of the page, and the number on the Items you have added tab increments by one to indicate that you have added an item from the Suggested items tab to the transfer you are drafting.
Note: Only the items listed on the Items you have added tab are included in the transfer when you submit it.
-
Repeat the steps above as many times as needed to add suggested items to the transfer.
-
-
 (If necessary) Add additional items that need to be transferred.
You can search for items in the inventory that are not already in the Resupply items or Return items tables, and add any items from the search results as needed.
Example: You anticipate a need for more cold packs than usual to apply to strain and sprain injuries during an upcoming athletic event your agency is servicing, and additional cold packs have not yet been added to the transfer. You can search for the item and add it to the table, so that it is fully stocked (or temporarily over-stocked) before the event.
This search includes the item name and any agency "preferred names" the Inventory module administrator configured for items on the Settings pages.
-
Under Resupply items, on the right side above the list of items, in Search for items to add, type the combination of characters you want to search the list of items for.
As you type each character, the list of options in the menu reduces to only those whose names or values contain that combination of characters.
Example: If you typed the characters
pack, the list of menu options reduces to display only the items whose names or values contain these characters, and which have not been added to the transfer. -
Choose the item in the menu you want to add to the list.
The Add to new transfer dialog box appears, with the Restock more bookmark selected in the left pane. In the right pane, the item name, and the number of usable, unusable, min, and max par currently available for the item at the location that will send the item.
The Inventory module automatically populates the Location inventory will be restocked from field with the value you chose earlier.
-
Depending on what kind of transfer you want to perform, follow the steps to restock or return expired, expiring, or oversupplied items, as described under step e, above.
-
Repeat steps i–iii as many times as needed to add items to the transfer, that were not automatically suggested by the Inventory module.
-
-
 Review the items added to the transfer.
-
On the Create new transfer page, click the Items you have added tab.
The list of items you have added to the transfer appears.
Note: Only the items listed on this tab are included in the draft transfer; items listed on the Suggested items tab are not included.
-
(If necessary) Update the items listed on the tab in any of the following ways.
 Change the quantity of an item in the transfer.
-
On the Items you have added tab, on the right end of the row for the item you want to work with, click Actions and choose Edit item from the menu that appears.
The Edit stock in transfer dialog box appears. Depending on the action you had chosen (restock or return) for the item when you added it to the transfer list, the appropriate bookmark (Restock more, Return expiring, Return expired, or Return oversupply) is selected in the left pane. In the right pane, the item name, and the number of usable, unusable, min, and max par numbers for that item appear. The right pane also contains fields corresponding to the quantity of the item you want to restock or return.
-
Edit the amounts in the quantity fields in the right pane as needed.
-
Click Update items (number).
A small green circle with a check mark and a confirmation message appears in the right pane.
-
In the upper right corner of the dialog box, click Close.
A confirmation message appears in the upper right corner of the page.
 Remove an item from the transfer.
-
On the Added items tab, on the right end of the row for the item you want to work with, click Actions and choose Remove item from the menu that appears.
The Inventory module moves the item back to the Suggested items tab, a success message appears in the upper right corner of the page, and an Undo button appears in the table row of the item you removed.
-
(Optional, to retrieve the deleted item) Click Undo.
The Inventory module moves the item back to the Added items tab.
-
-
-
-
For Included notes (optional), type any additional information about the items you are requesting from or returning to the location you selected in step 4.
-
 (If necessary) Discard a transfer.
-
In the lower left corner of the page, below Included Notes (optional), click Discard this draft transfer.
A confirmation dialog box appears.
-
Click Yes, I want to discard this draft transfer.
The Draft status page reappears. If it had been an existing transfer, the transfer you discarded no longer appears in the table.
-
-
Depending on whether you are finished adding items to the draft transfer, do one of the following.
 Save the items currently added to the transfer, but do not submit the transfer yet.
-
In the upper right corner or below the list in the lower right corner, click Save draft.
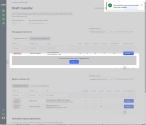
The Draft page reappears, and the transfer you created appears in the table on that page.
Tip: If you click Back to transfers, in the upper left corner of the page, the Inventory module automatically saves your changes to the draft, and the Draft page reappears.
-


