Manage a user account
If you have the necessary permissions, you can set up an ESO Suite user account and login credentials for an individual in your department or agency, change the user name and email address associated with the account, assign security roles to the user account, change the account password, deactivate/re-activate the account, and lock the user out of the ESO Suite.
-
 (If you have not done so already) Access the PM or PM Basic module in the ESO Suite.
Which version of the module opens depends on whether your agency or department has purchased the PM Basic or full version of the PM module.
-
Do one of the following.
-
(If you are already working in the ESO Suite) Click the Home icon in the upper left corner of the screen.
-
 (If you have not yet logged in) Log in to the ESO Suite.
-
In a web browser, go to https://www.esosuite.net/EsoSuite.
The ESO Suite login screen appears.
-
Enter your user name, password, and agency name, then click Let's Go.
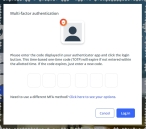
If MFA is enabled, the Multi-factor authentication dialog box appears, displaying one or more methods you can use to verify your login credentials. The number of methods that appear in the dialog box depends on what MFA methods your ESO Suite administrators enabled in the Admin module.

Click graphics
to open them.Information on enabling MFA and specific MFA methods is available in the Admin module online help, in Configure multiple-factor authentication.
Note: If your ESO Suite administrators have disabled MFA ("opted-out"), this dialog does not appear.
-
(If the Multi-factor authentication dialog box appears) Depending on which buttons appear in the dialog box, verify your login in one of the following ways.
 With an authenticator application.
-
Click MFA verification via authenticator app.
The dialog box updates with boxes for entering the numbers of the authentication code, and the ESO Suite sends an authentication code to the authenticator application installed on your device.
-
Open your authenticator application and note the authentication code currently displayed.
-
Enter the authentication code displayed in the authenticator application.
-
Click Log In.
 With a text message (SMS).
-
Click MFA verification via SMS.
The dialog box updates with boxes for entering the numbers of the authentication code, and the ESO Suite sends an authentication code to the phone number recorded in your PM records and identified with MFA codes.
-
Enter the authentication code sent to your MFA-registered phone number.
-
Click Log In.
 With an email message.
-
Click MFA verification via email.
The dialog box updates with boxes for entering the numbers of the authentication code, and the ESO Suite sends an authentication code to your agency or department email address, recorded in your PM records.
-
Enter the authentication code sent to your agency or department email address.
-
Click Log In.
-
-
The ESO Suite landing screen appears.

Click graphics
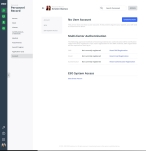
to open them.Note: If MFA is enabled, you can access and manage your MFA options through the PM module, on the Settings > Account page, as described in Manage a user account. If your agency or department has enabled MFA but has not purchased the full-featured version of the PM module, you can access your own MFA settings by clicking Change my Multi-Factor Authentication settings on the landing screen, then using the Settings > Account page that appears. If your agency has not enabled MFA, the Change my Multi-Factor Authentication settings link does not appear on the landing screen.
-
-
On the top side of the home screen, click PM.
Tip: If your screen or browser window is too narrow to display all your agency's ESO Suite module icons, an options icon appears on the right side of the icon bar. If you click the options icon, a menu appears containing additional module icons.
A list of all the personnel in the PM module appears, displayed in a grid format.
PM (full version) PM Basic Note: If you can access the full-featured PM module, you can view all your own information in it. The amount of information you can edit in the PM module depends on what roles and permissions your ESO Suite administrator assigned to your user account.
Information on user accounts, roles, and permissions is available in Manage a user account.
-
-
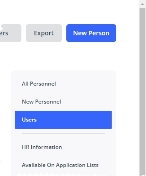
On the right side of the page, click Users.
The Users appears, listing all the personnel in your department or agency.
PM (full version) PM Basic Tip:
-
Any personnel with an entry in the User Name column has an ESO Suite user account and login credentials.
-
In the Work Email column, the list of roles assigned to each column appears. If the role list is wider than can be displayed in the column, and ellipses (...) appears at the right edge of the column. If you hover your mouse pointer over the ellipses, the full information appears in a pop-up.
-
-
Click the name of the person whose personnel record you want to work with.
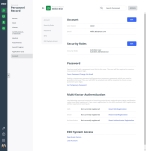
The Personnel Settings screen appears, with the Account tab selected in the left pane and the user's account information displayed in the right pane. Depending on whether or not the person already has an ESO Suite user account, different amounts of information appear on the screen.
With user account No user account -
Work with account information in any of the following ways.
 Create a user account.
If you have the necessary permissions, you can create a user account for a person, so they can log into the ESO Suite.
-
On the right side of the No User Account section, click Create Account.
The Account dialog box appears on the right.
-
In User Name, type the name the user will enter when logging in to the ESO Suite.
-
In Email, type the email used for password resets.
Email addresses must be in the
name@domain.suffixformat.Example:
YourName@eso.comNote: This is the same email address that appears on the Personal Record person name > Person tab > Emails section > Work Email field. If you change the email on this Account page, the change propagates to the Person tab; similarly, if you change the email on the Person tab, the change propagates to this Account page.
-
Click Save.
The pane on the right updates with additional sections for assigning security roles and managing the person's MFA.
 Change the user name and email address.
If you have the necessary permissions, you can change the user name and email address associated with a person's login to the ESO Suite to correspond to changes in an individual's record, such as a name change after getting married.
-
On the right side of the Account section, click Edit.
The Account dialog box appears on the right.
- Change the information in the fields as needed.
- Click Save.
 Add or remove user roles for the person's account.
A role is a set of security permissions that person needs to access specific modules and perform tasks throughout the ESO Suite. A collection of pre-defined roles ship with the ESO Suite.
If you have the necessary permissions, you can assign the roles a person needs to perform tasks throughout the ESO Suite. If necessary, you can later change the role assignments to correspond to changes in the person's tasks and responsibilities in the ESO Suite.
-
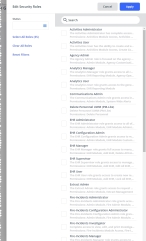
On the right side of the Security Roles section, click Edit.
The Edit Security Roles dialog box appears on the right.
Tip: If the list of permissions in a role is wider than can be displayed in the column, and ellipses (...) appears at the right edge of the column. If you hover your mouse pointer over the ellipses, the full information appears in a pop-up.
-
(Optional) In the Search field above the list of security roles, begin typing characters in the name of the security role you want to find.
As you type, the list of roles reduces to only those whose names still match the characters you are entering.
-
On the left, for Status, click the list icon to the right of the field, select all the appropriate options from the menu that appears, then click OK or click outside the menu.
The module searches for security roles with assigned or not-assigned statuses that match your selections, and the list of security roles on the right reduces to display only the ones that match.
-
Choose the security roles you want to apply in one of the following ways.
To do this Do this Select all roles currently listed.
- Click Select All Roles.
Manually select individual roles.
- In the list of roles on the right, select the specific security roles.
Remove all roles from the user.
- Click Clear All Roles.
-
(If necessary) Click Reset Filters to clear all your filter selections at once.
You can also manually deselect individual roles.
-
Click Apply.
 Reset passwords for the person's account.
If you have the necessary permissions, you can reset a person's password for the ESO Suite.
-
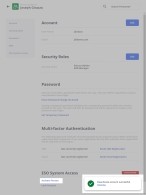
In the Password section, reset the password in one of these ways.
 Through an automated email message.
-
Click Force Password Change Via Email.
The Force Password Change dialog box appears.
-
Click Yes.
In the lower right corner of the page, a confirmation dialog box appears.
-
Click Dismiss.
The PM module sends the user an email from
notifications@esosolutions.com. -
Instruct the user to check their email for one from
notifications@esosolutions.com, and to follow the prompts in the dialog box as needed to create a new password when they log into the ESO Suite again.
 Set a temporary password.
-
Under Password, click Set Temporary Password.
The Set Temporary Password dialog box appears.
-
Click Yes.
A new dialog box appears, displaying the personnel member's temporary password, and instructions for sharing the password with the personnel member.
-
Click Copy Password.
In the lower right corner of the page, a confirmation dialog box appears.
-
Click OK.
Note: If you did not copy the temporary password before closing the window, repeat the process to get a new temporary password.
-
Share the password with the personnel member, following your agency or department's security guidelines.
-
In the temporary dialog box, click OK.
-
 De-register your MFA method(s).
When your ESO Suite administrator configured MFA for your department or agency, they enabled the delivery method for MFA authentication codes by authenticator application, email, and/or text message (SMS). Those methods were then presented to you when you logged into the ESO Suite for the first time, and you registered any of these as your authentication method.
The email address or phone number you registered with appears in the PM module in the following places:
-
On the Account page, in the Multi-factor Authentication section.
-
On the Person page, in the Phone and Emails sections.
An indication of whether or not you registered to use an authenticator application appears on the Account page, in the Multi-factor Authentication section.
Note: The authenticator application method uses a TOTP, not a push notification like email or SMS. Personnel using this method must access their device running their authenticator application and look up the pass code.
If necessary, you can reset (de-register) any of your authentication methods.
Information on de-registering your authentication methods on the Account page is available below. Information on resetting your authentication methods on the Person page is available in Specify personal information.
Note: After you reset the phone number, you can re-register your MFA authentication with a different phone number. However, you can only re-register an email address for MFA authentication with your agency or department email address.
Information on enabling MFA and specific MFA methods is available in the Admin module online help, in Configure multiple-factor authentication.
-
Under Multi-factor Authentication, depending on which authentication methods have delivery details listed, click Reset SMS Registration, Reset Email Registration and/or Reset Authenticator Registration.
A confirmation dialog box appears.
Note: If you remove your MFA registration for all of these methods, you will need to re-register at least one method the next time you log in to the ESO Suite.
-
Click Yes.
A confirmation of the removal appears in the lower right corner of the page, and the delivery details for that method updates to Not currently registered.
 Manage access for the person's account.
If you have the necessary permissions, you can deactivate and reactivate the user's account, or lock the user out of the ESO Suite.
-
In the ESO System Access section, manage the user account in one of these ways.
 Deactivate the person's user account.
You can deactivate a user account to remove their access to the ESO Suite, and then reactivate the account later.
-
Click Deactivate Person.
The Deactivate User dialog box appears.
-
For Remove all security roles, move the slider to Yes or No, then click Deactivate Person.
A red Deactivated label appears to the right of the ESO System Access heading, and Deactivate Person is renamed to Activate Person. If you had chosen to remove all user roles, any roles listed in the Security Roles section disappear. In the lower right corner of the page, a confirmation dialog box appears.
-
Click Dismiss.
 Reactivate the account.
-
Click Activate Account.
The Activate User dialog box appears.
-
Click Yes.
The red Deactivated label disappears from the right of the ESO System Access heading, and Activate Person is renamed to Deactivate Person. In the lower right corner of the page, a confirmation dialog box appears.
Note: If you had chosen to remove all user roles when the account was deactivated, no roles appear in the Security Roles section, and you need to manually reassign the user’s roles.
-
Click Dismiss.
 Lock the user out of the ESO Suite.
You can lock a user account to prevent the user from accessing the ESO Suite, without deactivating their account. This may be necessary if a mobile device with the EHR module is compromised, or if the user's password is no longer secure.
-
-

