Work with pending transfers
When you submit a transfer with the Draft status for fulfillment by a location, the Inventory module changes the transfer's status to Pending. This status indicates that the transfer is waiting to be accepted and processed by that location. You can review the details of any transfer submitted by the selected location, or submitted to the selected location. As long as a transfer has a Pending status, you can still change the status back to Draft and update the transfer.
-
(If you have not done so already) Access the Transfers features in the Inventory module, select the location you want to work with, and manage the amount of data on the page, as described in Transfer items between locations.
-
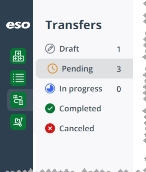
In the Transfers pane, click Pending.
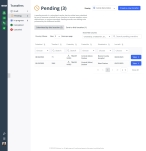
The Pending page appears in the right pane, with the Submitted by this location tab selected. This tab displays a summary of any transfers created by the location you selected in the Viewing field in the upper right corner of the page. These transfers have been submitted to other locations to fill item requests or to return expired, expiring, or overstocked items.
-
 Review the details of a transfer submitted by this location to another location, and update it if necessary
You can review the details of a transfer submitted by this location to another location, and make updates to it if needed.
-
On the right end of the row for the transfer you want to work with, click View.
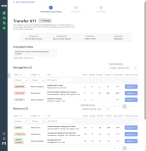
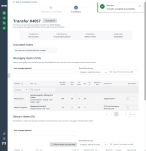
The Transfer page appears, providing the details of that particular transfer.
While you can not edit the information on this page, you still have the option to send the transfer back to the
Draftstatus and edit the information on the Drafts page. You also have the option to cancel the transfer and discard it at this stage. -
Review the information about the transfer as needed.
-
 (Optional) Update or cancel the transfer.
-
Depending on what you want to do, update or cancel the transfer.
 Update the transfer.
While it is still in the
Pendingstatus, you can return the transfer to theDraftstatus, make changes to the transfer, and submit it again. This is convenient if you forgot to include items on the transfer that the location needs.Note: If another transfer between the submitting and fulfilling locations also currently exists on the Drafts page, the draft with the
Pendingstatus cannot be returned to draft, as only one transfer can exist between the two locations at any time. To update this transfer, you must first go to the Drafts page and cancel the transfer on that page. Cancel the transfer.
-
In the lower right corner of the page, click Cancel transfer request.
A confirmation dialog box appears.
-
Click Yes, I want to cancel this transfer.
The Draft status page reappears, and in the Transfers pane, the number to the right of Pending decreases by one, to indicate that the pending transfer was canceled. For audit trail purposes, the Inventory module moves the transfer to the Canceled status page.
-
-
-
-
 Review the details of a transfer submitted to this location from another location, and accept it for processing.
You can review the details of a transfer submitted to this location from another location, and accept the transfer for processing. After you accept it, you can begin processing the transfer (fulfilling it). You can also begin processing the transfer from the In progress status page.
-
Click the Sent to this location tab.
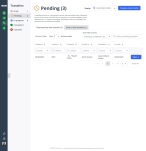
This tab displays a summary of any transfers created by another location, and submitted to the location you selected in the Viewing field in the upper right corner of the page. This location will supply items requested for restocking as best it can, and accept expired, expiring, or overstocked items from the other location.
-
On the right end of the row for the transfer you want to work with, click View.
The Transfer page appears, providing the details of that particular transfer.
While you cannot edit the information on this page, you can launch the process for restocking requested items or accepting returned items from this page.
-
Review the information about the transfer as needed.
-
 (Optional) Begin processing the transfer.
-
In either the upper right or lower right corner of the page click Start processing this transfer.
A success message appears briefly in the upper right corner of the field, the status tracker at the top of the page moves to 2 In progress, and fields relevant to the items being restocked or returned activate in the Resupply items and Return items tables on the page.
You can now begin physically gathering any items requested for resupply and checking-in returned items. In the Inventory module, you also need to track the items leaving the location for restocking, and coming into the location as returns.
-
Under Included notes, read any additional information sent with the transfer.
-
 Under Resupply items, specify how many of the items the location sent to fill the restock requests.
-
For each row in the table, in the Qty Fulfilled column, type the number of items the location can send to fill the item request.
Note: This item does not have to match the quantity requested, if the location does not have sufficient inventory to fill the request.
Example: A transfer requests 500 acetaminophen capsules. The location filling the request has 400 capsules, and needs to retain 250 capsules to meet its own minimum par levels. In this case, you can enter
150in the Qty fulfilled column to indicate that the location can only partially fill the restock request.Example: A transfer requests 2 boxes of cold packs, but the location filling the request is out of stock for that item. In this case, you would enter
0in the Qty fulfilled column for the cold pack row. -
In Your message (optional), type a message to the requesting location about any items it is restocking.
Example:
We have no cold packs available. Suggest contacting Vehicle 601, as it may have an oversupply of them.
-
-
 Under Return items, indicate how many of the returned items were accepted by the location.
-
For each row in the table, in the Qty Received column, type the number of items the location actually accepted for return.
Note: This item does not have to match the quantity returned.
Example: A transfer request may include returning an expired, controlled medication that must be disposed of in a specific way. If the receiving location does not have the means to dispose of the medication appropriately, you would enter
0in the Qty Received column to indicate that the location is refusing the return.Example: A transfer request may indicate that 500 acetaminophen capsules are being returned, but the person physically counting the capsules at the receiving location discovers that only 400 capsules were actually sent. In this case, you would enter
400in the Qty Received column to indicate that the location received fewer of the item than the transfer indicated. -
In Your message (optional), type a message to the requesting location about any items being returned.
Example:
We are not able to appropriately dispose of expired morphine at this location. Suggest contacting a hospital location to handle this return.
-
-
 Save or complete the transfer.
-
Depending on whether or not you have finished processing the transfer, do one of the following.
 Save the transfer so you can continue working on it later.
-
Below the Return items table, in the lower left corner of the page, click Save and close transfer.
The Draft status page reappears. In the Transfers pane, if you click In progress, then click the Sent to this location tab, the transfer you were working on fulfilling still appears in the table.
 Complete the transfer.
-
Below the Return items table, in the lower right corner of the page, click Save and complete transfer.
The Draft status page reappears. The Inventory module updates the inventory records in both locations, updates the transfer's status to
Completed, and moves the transfer listing to the Completed status page.In the Transfers pane, if you click Completed, then click the Sent to this location tab, the transfer you fulfilled appears in the table.
-
-
-
-
