Upload your agency's current inventory information
Your agency's inventory consists of the medicines and medical supplies that it currently holds at all of its locations. This is not the same as its item catalog, which is the exhaustive list of all the medicines and medical supplies your agency can obtain and control.
When you first purchase the Inventory module for your ESO Suite, it does not contain any information about the items your agency currently has in stock. You need to specify this information as part of your agency's onboarding process with the Inventory module.
-
 If you have not done so already) Access the Inventory module in the ESO Suite.
-
Do one of the following.
-
(If you are already working in the ESO Suite) Click the Home icon in the upper left corner of the screen.
-
(If you have not yet logged in) Log in to the ESO Suite.
-
In a web browser, go to https://www.esosuite.net/EsoSuite.
The ESO Suite login screen appears.
-
Enter your user name, password, and agency name, then click Let's Go.
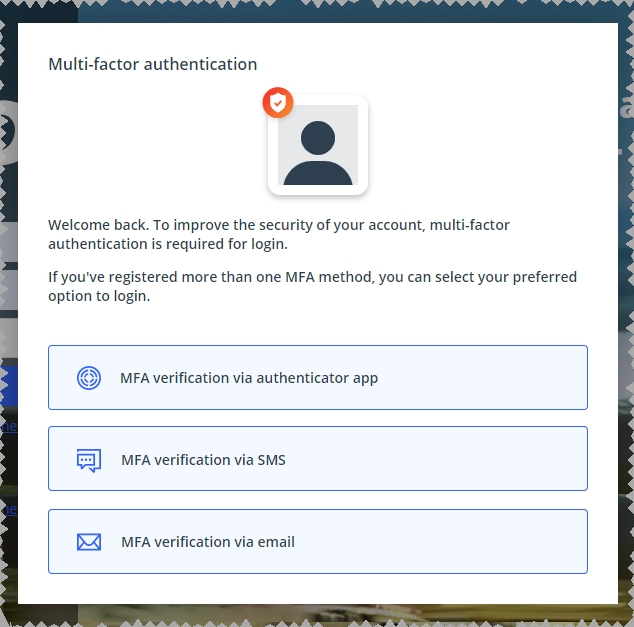
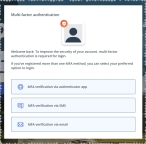
If MFA is enabled, the Multi-factor authentication dialog box appears, displaying one or more methods you can use to verify your login credentials. The number of methods that appear in the dialog box depends on what MFA methods your ESO Suite administrators enabled in the Admin module.
Click graphics
to open them.Information on enabling MFA and specific MFA methods is available in the Admin module online help, in Configure multiple-factor authentication.
Note: If your ESO Suite administrators have disabled MFA ("opted-out"), this dialog does not appear.
-
(If the Multi-factor authentication dialog box appears) Depending on which buttons appear in the dialog box, verify your login in one of the following ways.
With an authenticator application.
-
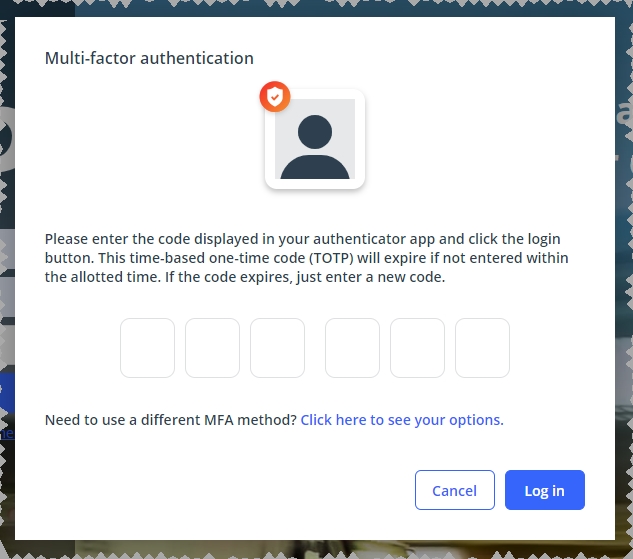
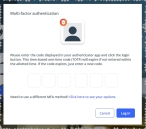
Click MFA verification via authenticator app.
The dialog box updates with boxes for entering the numbers of the authentication code, and the ESO Suite sends an authentication code to the authenticator application installed on your device.
-
Open your authenticator application and note the authentication code currently displayed.
-
Enter the authentication code displayed in the authenticator application.
-
Click Log In.
With a text message (SMS).
-
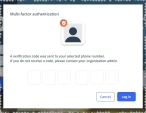
Click MFA verification via SMS.
The dialog box updates with boxes for entering the numbers of the authentication code, and the ESO Suite sends an authentication code to the phone number recorded in your PM records and identified with MFA codes.
-
Enter the authentication code sent to your MFA-registered phone number.
-
Click Log In.
With an email message.
-
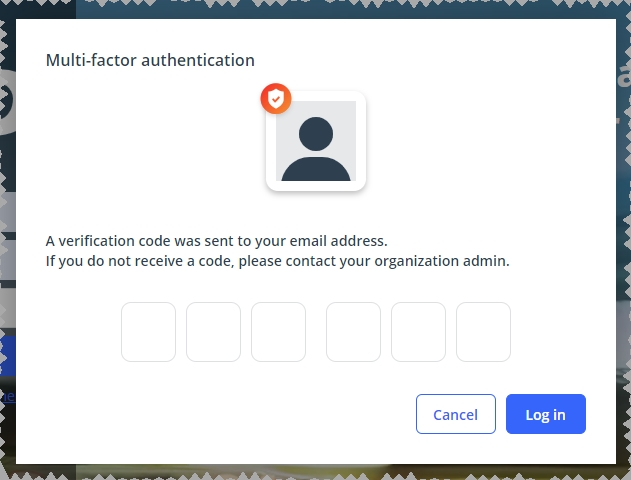
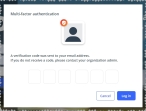
Click MFA verification via email.
The dialog box updates with boxes for entering the numbers of the authentication code, and the ESO Suite sends an authentication code to your agency or department email address, recorded in your PM records.
-
Enter the authentication code sent to your agency or department email address.
-
Click Log In.
-
-
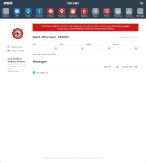
The ESO Suite landing screen appears.
Click graphics
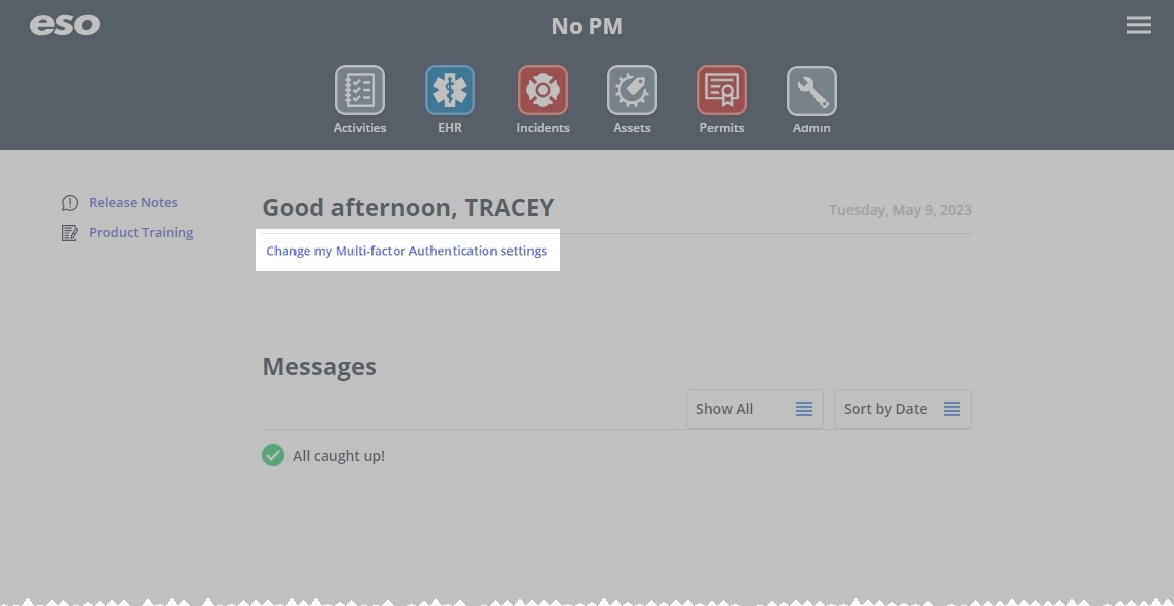
to open them.Note: If MFA is enabled, you can access and manage your MFA options through the PM module, on the Settings > Account page, as described in Manage a user account. If your agency or department has enabled MFA but has not purchased the full-featured version of the PM module, you can access your own MFA settings by clicking Change my Multi-Factor Authentication settings on the landing screen, then using the Settings > Account page that appears. If your agency has not enabled MFA, the Change my Multi-Factor Authentication settings link does not appear on the landing screen.
-
-
-
On the top side of the home screen, click Inventory.
 Tip: (On a narrow screen or browser window) Display more module icons.
If your screen or browser window is too narrow to display all your agency's ESO Suite module icons, the More Apps icon appears on the right side of the icon bar. If you click this icon, a menu appears containing additional module icons.
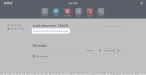
The Inventory module opens, displaying the Action now page and the Welcome to Inventory! message.

Click graphics
to open them. -
In Step 4: Upload your current inventory, click Upload inventory.
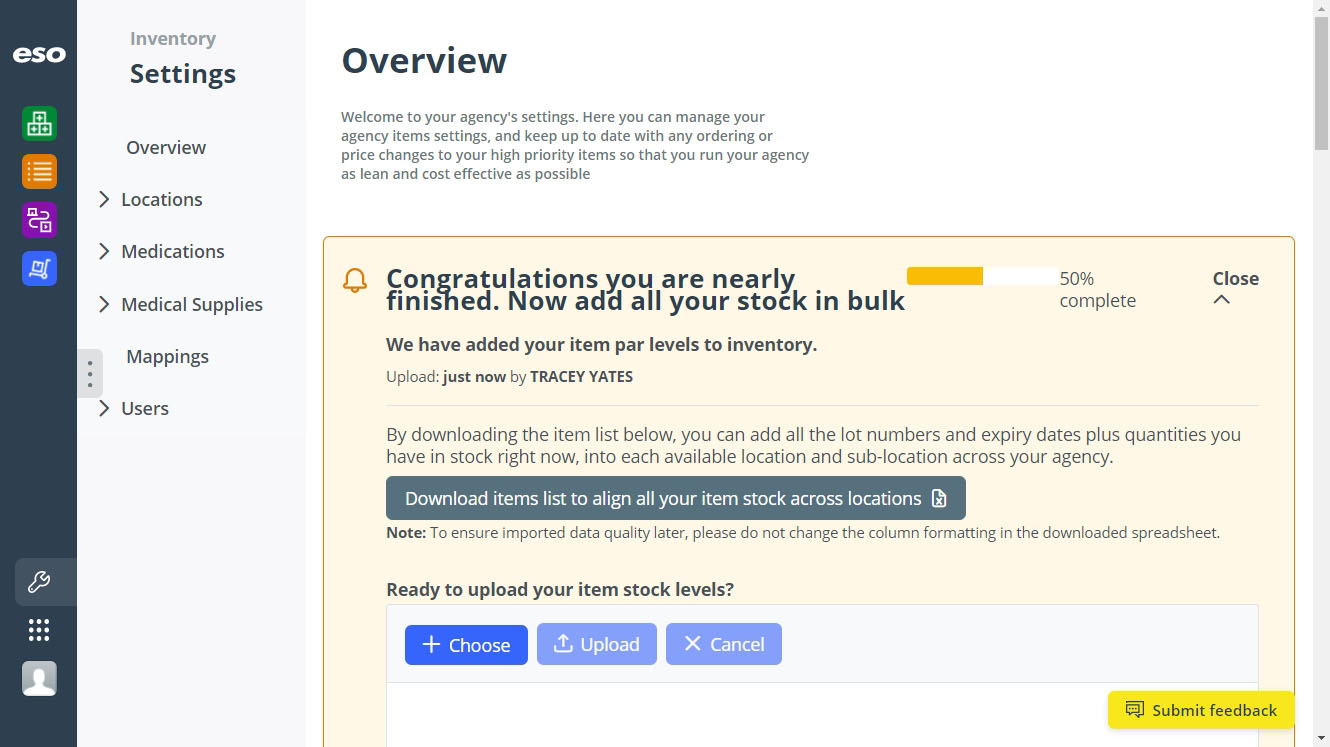
The Inventory module takes you to the Settings pages, and the Overview page appears on the right. From this page, you can specify the number or amount of every item in the item catalog, for every location, by populating and uploading a spreadsheet of your agency's current inventory.

-
Download the blank inventory spreadsheet.
-
In the Congratulations section, click Download items list to align all your item stock across locations.
The
Inventory_Levels.xlsxspreadsheet downloads to your default download location, or prompts you for a location, depending on your browser settings. -
Navigate to the download location and open the spreadsheet.

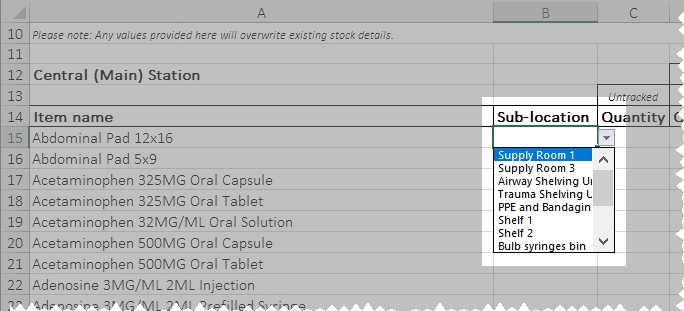
At the bottom of the spreadsheet is a sheet tab for each of your agency's locations, with the first location tab selected by default.

In column A, the spreadsheet lists every item in your agency's item catalog, and the rest of the columns let you specify where items are stored, how much you have on hand, and whether or not you need to track that item by lot number and expiration date.
-
-
Populate the spreadsheet with current inventory data.
-
In the yellow Protected View banner across the top of the spreadsheet, click Enable Editing.
-
In the row for the first item in your agency's item catalog, in the Sublocation column, click the cell and choose the sublocation the item is stored in.

-
Depending on whether or not your agency tracks the item's lot number and expiration date, do one of the following.
The agency does not track the item's lot number and expiration date.
-
In the same row, in the UntrackedQuantity column, click the cell and enter the number or amount of the item in that sublocation.

The agency tracks the item's lot numbers and expiration dates
Because an item can come from a supplier in lots or batches, and each lot or batch can have its own expiration date, the spreadsheet contains groups of columns under the heading Tracked items details. Each group of columns is identified as Lot 1, Lot 2, and Lot 3, and contain columns for specifying the lot/batch number, the number or amount in inventory of that specific lot/batch number, and the expiration date for that lot/batch.

-
In the same row, in the Tracked items details group of columns, in the Lot 1 sub-group of columns, click the cells in the Quantity, Lot #, and Expiry date columns, and enter the necessary information for that lot or batch.
-
(If you have more than one lot or batch of that item in inventory) In the same row, in the Lot 2 and Lot 3 sub-groups of columns, enter the necessary information for the additional lots or batches.
-
-
Repeat the previous steps b–c for every item row in that location's page in the spreadsheet.
-
Save your changes in the spreadsheet.
-
At the bottom of the spreadsheet, click the sheet tab for the next of your agency's locations.
The unfilled inventory page for that location appears.
-
Repeat steps b–f until you have filled all the location sheet tabs in the spreadsheet with your current inventory information.
-
-
Upload the populated inventory spreadsheet.
-
In the Inventory module, in the Congratulations section, under Ready to upload your item stock levels?, click Choose.
-
Use the file browser that appears to navigate to and open the spreadsheet you populated with inventory levels for your agency.
The name of your file appears under Ready to upload your item stock levels?, and the Upload and Cancel buttons activate.

-
Click Upload.
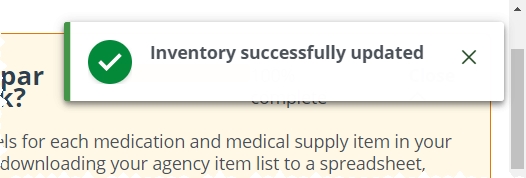
A progress bar appears across the bottom of the section, then a success message appears in the upper right corner of the page when the Inventory module finishes uploading the spreadsheet to the ESO Suite database.

At the top of the Overview page, the Congratulations section updates, and now contains instructions for refreshing the par and inventory level information you have already uploaded to the ESO Suite database.

-
-
Verify that the spreadsheet data appears in the Inventory module.
-
In the upper left corner of the screen, click the Inventory list icon.

The Inventory list page appears, displaying a listing of every item in your agency's item catalog at the location selected in the upper right corner of the page, from the Viewing menu. The page contains information about the number or quantity of each item currently in the inventory at that location, the min and max par levels for that locations, and so forth.

-
In the inventory list, compare the current values in the Inventory module to the values you specified in the spreadsheet.

-
-
Proceed to the next onboarding task.
-
In the upper left corner of the screen, click the Action now icon.
The Action now page appears. In the Welcome to Inventory! section, the Step 4: Upload your current inventory now has a check mark in front of it to indicate that you completed all the sub-tasks within this step, the word Complete now appears below Step 4, and the drop-down for the section is closed. The progress bar at the top of the Welcome to Inventory! section, reflects your current progress through the onboarding tasks, and Step 5: Map your agency treatments to items (Optional) has automatically opened to guide you to the next set of tasks in the onboarding process.

Tip: If you want to review the completed onboarding tasks in the Welcome to Inventory! section, on the right side of the section, click Open. The task expands, and you can see all the text and buttons related to completing this task.
-
Continue to the next step in agency's onboarding tasks, as described in Map inventory items to treatments.
-