Acute coronary syndrome
Acute coronary syndrome describes a variety of myocardial conditions that result from a sudden reduction of blood flow through the coronary arteries supplying oxygen and nutrients to heart muscle. This includes unstable angina as well as acute myocardial infarction.
-
 (If you have not done so already) Access the EHR module in the ESO Suite.
-
Do one of the following.
-
(If you are already working in the ESO Suite) Click the Home icon in the upper left corner of the screen.
-
 (If you have not yet logged in) Log in to the ESO Suite.
-
In a web browser, go to https://www.esosuite.net/EsoSuite.
The ESO Suite login screen appears.
-
Enter your user name, password, and agency name, then click Let's Go.
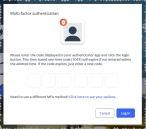
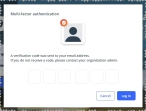
If MFA is enabled, the Multi-factor authentication dialog box appears, displaying one or more methods you can use to verify your login credentials. The number of methods that appear in the dialog box depends on what MFA methods your ESO Suite administrators enabled in the Admin module.

Click graphics
to open them.Information on enabling MFA and specific MFA methods is available in the Admin module online help, in Configure multiple-factor authentication.
Note: If your ESO Suite administrators have disabled MFA ("opted-out"), this dialog does not appear.
-
(If the Multi-factor authentication dialog box appears) Depending on which buttons appear in the dialog box, verify your login in one of the following ways.
 With an authenticator application.
-
Click MFA verification via authenticator app.
The dialog box updates with boxes for entering the numbers of the authentication code, and the ESO Suite sends an authentication code to the authenticator application installed on your device.
-
Open your authenticator application and note the authentication code currently displayed.
-
Enter the authentication code displayed in the authenticator application.
-
Click Log In.
 With a text message (SMS).
-
Click MFA verification via SMS.
The dialog box updates with boxes for entering the numbers of the authentication code, and the ESO Suite sends an authentication code to the phone number recorded in your PM records and identified with MFA codes.
-
Enter the authentication code sent to your MFA-registered phone number.
-
Click Log In.
 With an email message.
-
Click MFA verification via email.
The dialog box updates with boxes for entering the numbers of the authentication code, and the ESO Suite sends an authentication code to your agency or department email address, recorded in your PM records.
-
Enter the authentication code sent to your agency or department email address.
-
Click Log In.
-
-
The ESO Suite landing screen appears.

Click graphics
to open them.Note: If MFA is enabled, you can access and manage your MFA options through the PM module, on the Settings > Account page, as described in Manage a user account. If your agency or department has enabled MFA but has not purchased the full-featured version of the PM module, you can access your own MFA settings by clicking Change my Multi-Factor Authentication settings on the landing screen, then using the Settings > Account page that appears. If your agency has not enabled MFA, the Change my Multi-Factor Authentication settings link does not appear on the landing screen.
-
-
On the top side of the home screen, click EHR.
Tip: If your screen or browser window is too narrow to display all your agency's ESO Suite module icons, an options icon appears on the right side of the icon bar. If you click the options icon, a menu appears containing additional module icons.
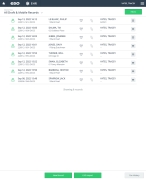
The EHR screen appears, displaying a list of patient records in the EHR module. The most-recent records appear at the top of the list.
Different record status icons can appear in the list.
Icon Status Unlocked/DraftThe patient record exists in the ESO Suite database, and all crew members listed in the patient record may edit all fields in the record. ESO Suite administrators and personnel with security roles of either
EHR SupervisororEHR Managercan edit non-clinical fields.MobileThe patient record exists on the mobile device, and has not been synchronized with the ESO Suite database. ESO Suite administrators, personnel with security roles of either
EHR SupervisororEHR Manager, and all crew members listed in the patient record can only access a print view of the record.Once the Mobile record synchronizes with the ESO Suite database. the record reflects its current status.
LockedThe patient record exists in the ESO Suite database, and is locked. Only non-clinical fields can be edited by crew members listed in the patient record, ESO Suite administrators and personnel with security roles of either
EHR SupervisororEHR Manager.
-
-
 (If you have not done so already) Add a new patient record, or search for the existing patient record you want to work with.
Information on adding or opening a patient record is available in Add a patient record and Search for a patient record.
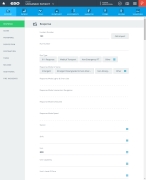
The patient record opens and displays the Incident tab, with the Response bookmark selected in the left pane. Fields appear in the right pane for specifying basic information about the incident
If you manually created a new patient record, the Incident Number and State Tracking Number fields populate automatically with ESO Suite-assigned values. You must enter data in all other required fields.
If you imported data from a CAD system, the Incident Number field populates with the data from that source. Other fields in the EHR module may also populate from these sources, depending on what data was recorded in them before the data was imported into the EHR module.
-
At the top of the page, click the Forms tab.
The contents of the Forms tab appear, listing all the forms your ESO Suite administrator has enabled in the Admin module.
-
Click Acute Coronary Syndrome.
The Acute Coronary Syndrome dialog box appears, with the OPQRST bookmark selected in the left pane.
-
Record the treatment data in one of these ways.
 Record the acute coronary syndrome data.
-
 Collect OPQRST data.
OPQRST is an mnemonic initialism medical providers use when taking a patient's symptoms and history in the event of an acute illness. Each letter stands for an important line of questioning for the patient assessment. The parts of the mnemonic are: onset, provocation/palliation, quality, region/radiation, severity, and time.
-
For Time, click the number pad icon to the right of the field, then enter the appropriate numerical values from the number pad dialog box that appears for the time someone noticed the myocardial condition beginning.
-
For Date, click the calendar icon on the right end of the field and select the appropriate date from the calendar that appears for the date someone noticed the myocardial condition beginning.
-
For Onset, click either Gradual or Sudden to indicate the rapidity with which the myocardial condition progressed.
-
In Provoke, type what the patient says makes the pain better or worse, and/or what the patient was doing when the pain started.
-
For the following fields, click the field or the list icon to the right of the field, then select the appropriate single option from the menu that appears.
Field Information needed Quality
A description of the type and intensity of the pain.
Example: Sharp, dull, changing
Radiate
Identification of where the pain is focused the most.
Example: Arm, back, neck
Severity
A description of "how bad it hurts, on a scale from 1–10.
Example: 5, 8
Note: Pain is subjective and relative to each individual patient; one patiient's severity rating of "5" could be vastly different from another patient's rating of "5."
-
-
 Identify thrombolytic criteria.
EMS personnel use the stroke thrombolytic checklist as a tool for the pre-hospital identification of patients who may need administration of thrombolytics for acute stroke. Thrombolytics (fibrinolytic drugs) are “clot-busting” drugs that break up and dissolve blood clots that get in the way of blood flow.
-
In the left pane, click the Thrombolytic Checklist bookmark.
The right pane scrolls down to the top of the Thrombolytic Checklist section of the page.
-
For Time, click the number pad icon to the right of the field, then enter the appropriate numerical values from the number pad dialog box that appears for the time EMS personnel check the patient for thrombolytic inclusion and exclusion criteria.
Note: This field appears in the EHR module only if your ESO Suite administrator enabled it in the Admin module, under EHR > Forms Tab > Configurable fields.
Information on enabling EHR fields is available in the Admin module online help, in Configure tabs.
-
For Date, click the calendar icon on the right end of the field and select the appropriate date from the calendar that appears for the date EMS personnel check the patient for thrombolytic inclusion and exclusion criteria.
Note: This field appears in the EHR module only if your ESO Suite administrator enabled the Time field in the Admin module, under EHR > Forms Tab > Configurable fields.
-
For the following fields, click the list icon to the right of the field, select all the appropriate options from the menu that appears, then click OK or click outside the menu.
Field Information needed Inclusion Criteria
Characteristics that qualify the patient for thrombolytic medications.
Example: Greater-than or equal-to 18 years old, evidence of ST elevation
Exclusion Criteria
Characteristics that disqualify the patient for thrombolytic medications.
Example: History of stroke, pregnancy, cardiogenic shock
-
-
 Record each the 12-lead ECG readings.
The 12-lead ECG gives a tracing from 12 different “electrical positions” of the heart. Each lead is picks up electrical activity from a different position on the heart muscle, allowing you to see the heart from many different angles.
-
In the left pane, click the 12-Lead bookmark.
The right pane scrolls down to the top of the 12-Lead section of the page.
-
For the following fields, click the field or the list icon to the right of the field, then select the appropriate single option from the menu that appears.
Field Information needed I
The electrical difference between the left and right arm electrodes.
II
The electrical differences between the left leg and right arm electrodes.
III
The electrical difference between the left leg and the left arm electrodes.
AVR
The reading from the positive electrode on the right shoulder.
AVL
The reading from the positive electrode on the left shoulder.
AVF
The reading from the positive electrode on the foot.
V1
The reading from the fourth intercostal space, right sternal border.
V2
The reading from the fourth intercostal space, left sternal border.
V3
The reading from the one-half way between V2 and V4 in straight line with them.
V4
The reading from the fifth intercostal space, midclavicular line.
V5
The reading from the fifth intercostal space, left anterior auxiliary line.
V6
The reading from the fifth intercostal space, left midauxiliary line.
-
-
 Record each the right-sided posterior ECG readings.
All patients with inferior wall myocardial infarction should have a right-sided ECG. Extra precordial leads may be used to evaluate additional regions not viewed with a typical 12 lead reading. They help diagnose posterior and right ventricular infarcts, which occur frequently in combination with inferior infarcts.
-
In the left pane, click the Right Sided - Posterior ECG bookmark.
The right pane scrolls down to the top of the Right Sided - Posterior ECG section of the page.
-
For the following fields, click the field or the list icon to the right of the field, then select the appropriate single option from the menu that appears.
Field Information needed V4R
The reading from the fifth right intercostal space in the mid-clavicular line.
Note: ST-segment elevation in lead V4 R is the single-most powerful predictor of right ventricular involvement, identifying a high-risk subset of patients in the setting of inferior wall myocardial infarction.
V5R
The reading from the right fifth intercostal space, anterior axillary line
V6R
The reading from the fifth intercostal space, mid-axillary line.
V7
The reading from the left posterior axillary line, in the same horizontal plane as V6.
V8
The reading from the tip of the left scapula, in the same horizontal plane as V6.
V9
The reading from the left paraspinal region, in the same horizontal plane as V6.
-
-
 Indicate if the ECG data was sent to the hospital.
If you determine a patient is experiencing a potential heart attack, and if the you find any abnormality in the ECG, you can send the ECG tracing to the receiving hospital ahead of the patient.
-
For 12-Lead Transmitted to Hospital, click Yes or No to indicate whether or not the data collected from the 12-lead ECG device was transmitted electronically to the hospital ahead of the patient.
-
-
-
Click OK.
The dialog box closes, and a green triangle appears in the upper right corner of the form button, to indicate that data exists in this form.


