Configure location information
You can create a list of pre-defined locations where your agency frequently visits, or might possible visit in the future. The Admin module helps organize this list into groups of similar locations, such as hospitals, doctor's offices/clinics, homes/residences, places of business, nursing homes, recreation centers, and so forth. This information is used in NEMSIS reporting.
When a medic in the field selects a location you have defined in the Admin module, information about that location automatically populates in the patient care record for the scene address. Some of these locations are also available as destinations, as determined by NEMSIS (a hospital, nursing home, care facility, and so forth).
This list of locations saves time for medics creating a patient care report, as they then do not have to manually fill it the information on-scene for every incident.
You can also create linkups for hospitals and EMS agencies when you add locations in the Admin module.
Information on linkups is available in Create a linkup.
-
Do one of the following.
-
(If you are already working in the ESO Suite) Click the Home icon in the upper left corner of the screen.

-
 (If you have not yet logged in) Log in to the ESO Suite.
-
In a web browser, go to https://www.esosuite.net/EsoSuite.
The ESO Suite login screen appears.
-
Enter your user name, password, and agency name, then click Let's Go.
If MFA is enabled, the Multi-factor authentication dialog box appears, displaying one or more methods you can use to verify your login credentials. The number of methods that appear in the dialog box depends on what MFA methods your ESO Suite administrators enabled in the Admin module.

Click graphics
to open them.Information on enabling MFA and specific MFA methods is available in the Admin module online help, in Configure multiple-factor authentication.
Note: If your ESO Suite administrators have disabled MFA ("opted-out"), this dialog does not appear.
-
(If the Multi-factor authentication dialog box appears) Depending on which buttons appear in the dialog box, verify your login in one of the following ways.
With an authenticator application.
-
Click MFA verification via authenticator app.
The dialog box updates with boxes for entering the numbers of the authentication code, and the ESO Suite sends an authentication code to the authenticator application installed on your device.

-
Open your authenticator application and note the authentication code currently displayed.
-
Enter the authentication code displayed in the authenticator application.
-
Click Log In.
With a text message (SMS).
-
Click MFA verification via SMS.
The dialog box updates with boxes for entering the numbers of the authentication code, and the ESO Suite sends an authentication code to the phone number recorded in your PM records and identified with MFA codes.

-
Enter the authentication code sent to your MFA-registered phone number.
-
Click Log In.
With an email message.
-
Click MFA verification via email.
The dialog box updates with boxes for entering the numbers of the authentication code, and the ESO Suite sends an authentication code to your agency or department email address, recorded in your PM records.

-
Enter the authentication code sent to your agency or department email address.
-
Click Log In.
-
-
The ESO Suite landing screen appears.

Click graphics
to open them.Note: You can access and manage your MFA options through the PM module, on the Settings > Account page, as described in Manage a user account. If your agency or department has enabled MFA but has not purchased the full-featured version of the PM module, you can access your own MFA settings by clicking Change my Multi-Factor Authentication settings on the landing screen, then using the Settings > Account page that appears. If your agency has not enabled MFA, the Change my Multi-Factor Authentication settings link does not appear on the landing screen.

-
-
On the top side of the home screen, click Admin.
Tip: If your screen or browser window is too narrow to display all your agency's ESO Suite module icons, an options icon appears on the right side of the icon bar. If you click the options icon, a menu appears containing additional module icons.

The Admin screen appears, displaying the Welcome screen.

-
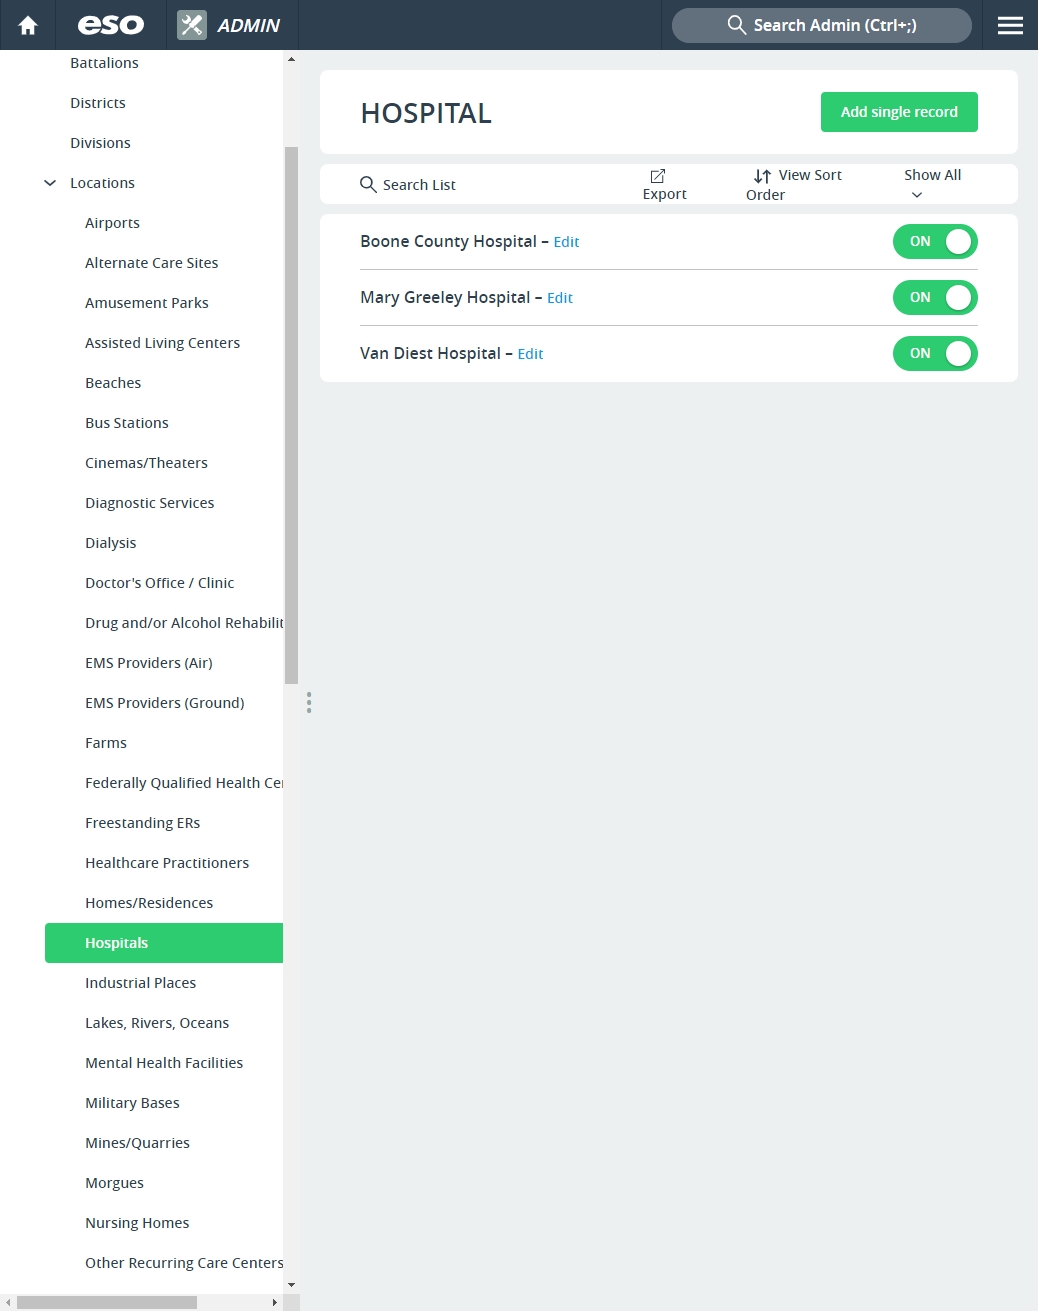
In the left pane, expand General > Locations.
A list of different types of locations appears.

-
Click the type of location you want to configure.
A screen named corresponding to the location type you selected appears.

-
Do any of the following.
Add a location.
-
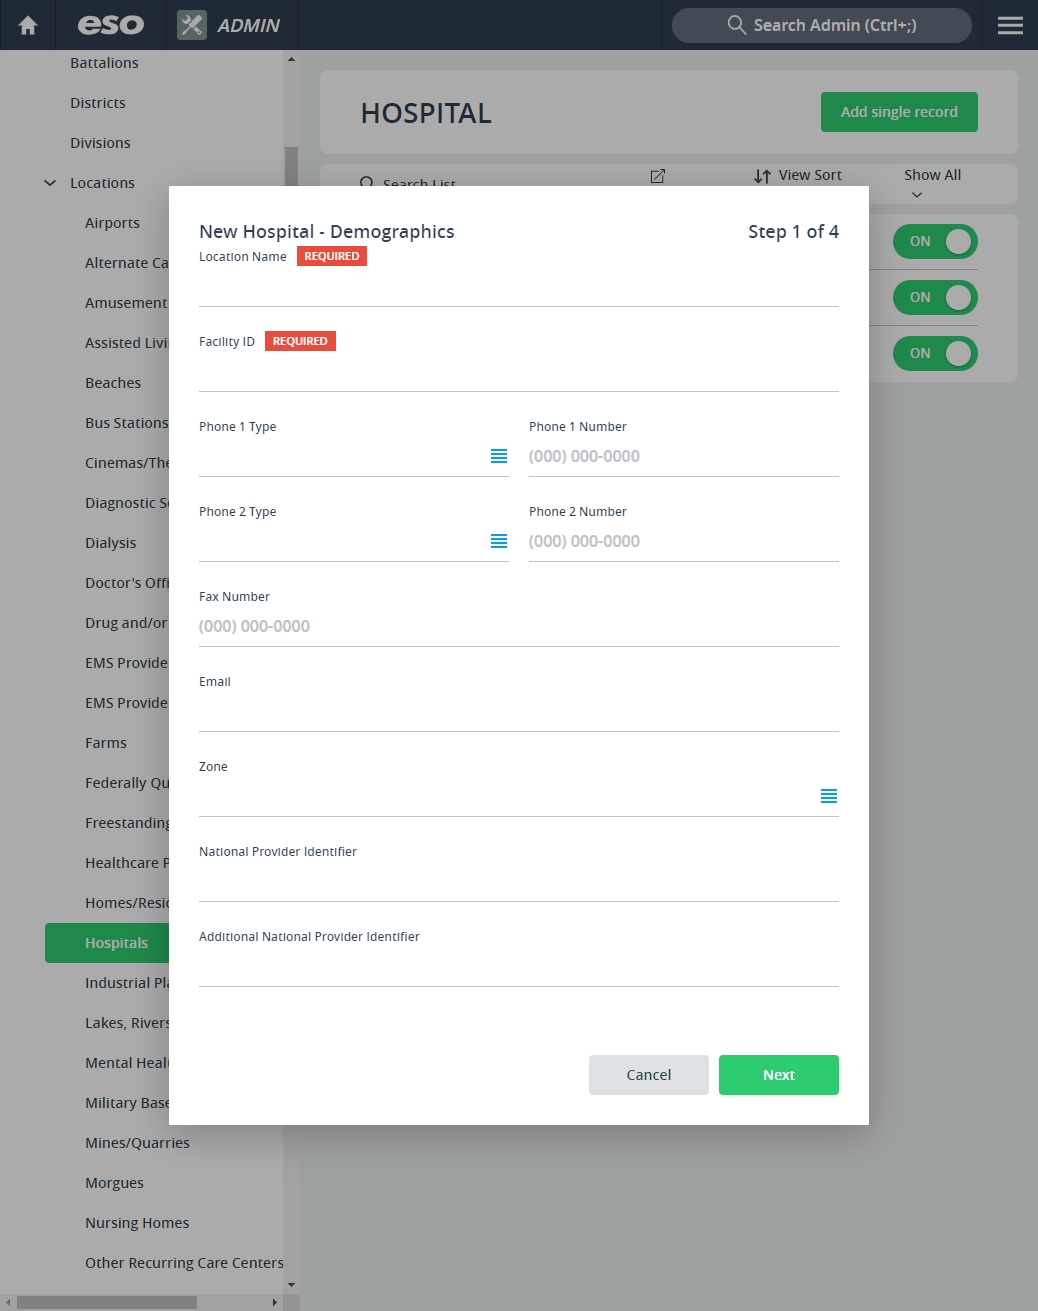
In the upper right corner, click Add.
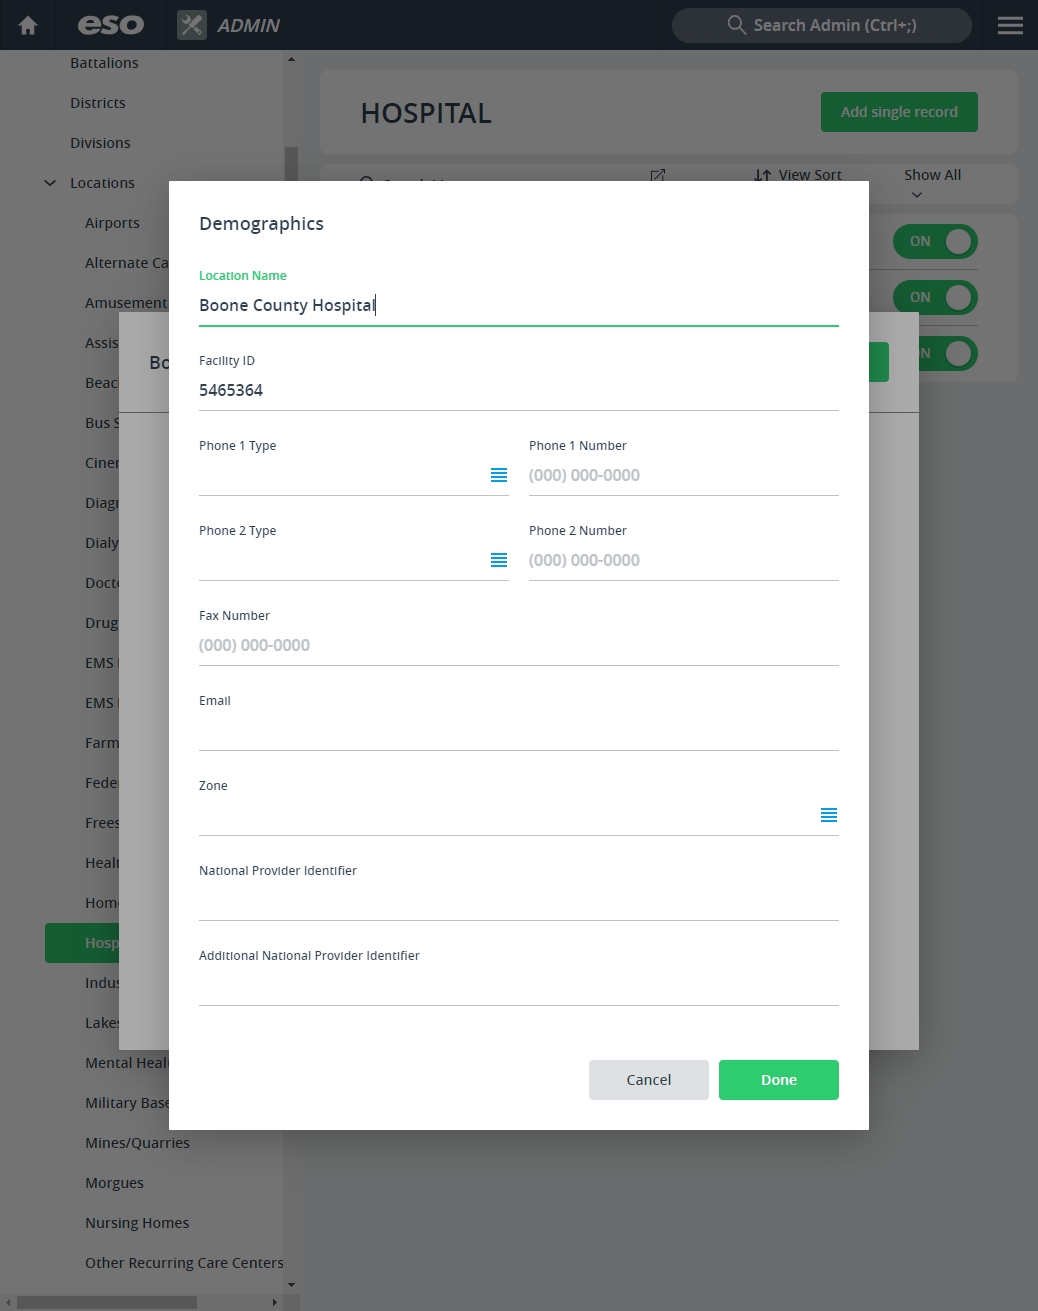
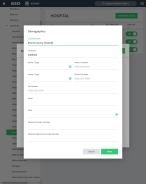
The New wizard appears, displaying the Demographics screen.

Note: You must fill in all fields indicated as
REQUIREDon this screen. -
Specify demographics information.
- In Location Name, type the name or description of the location.
-
In Facility ID, type the ID number assigned by the state to that location.
This code is assigned to hospitals and is required for NEMSIS submission purposes.
- From Phone 1 Type and/or Phone 2 Type, click the field or the list icon to the right of the field, then select the appropriate single option from the menu that appears.
-
In Phone 1 Number, Phone 2 Number, and Fax Number, type the phone and FAX numbers for the location.
If you enter a FAX number, the medic can send the care report directly to the location's FAX machine.
-
In Email, type an email address for the location.
Email addresses must be in the
name@domain.suffixformat.Example:
YourName@eso.comIf you enter an email address, the medic can email the patient’s care report in EHR directly to the location's email address.
- For Zone, click the field or the list icon to the right of the field, then select the appropriate single option from the menu that appears
- In National Provider Identifier, type the medical provider number assigned to the location by the CMS.
- (If necessary) In Additional National Provider Identifier, type any additional medical provider number assigned to the location by the CMS.
-
Click Next.
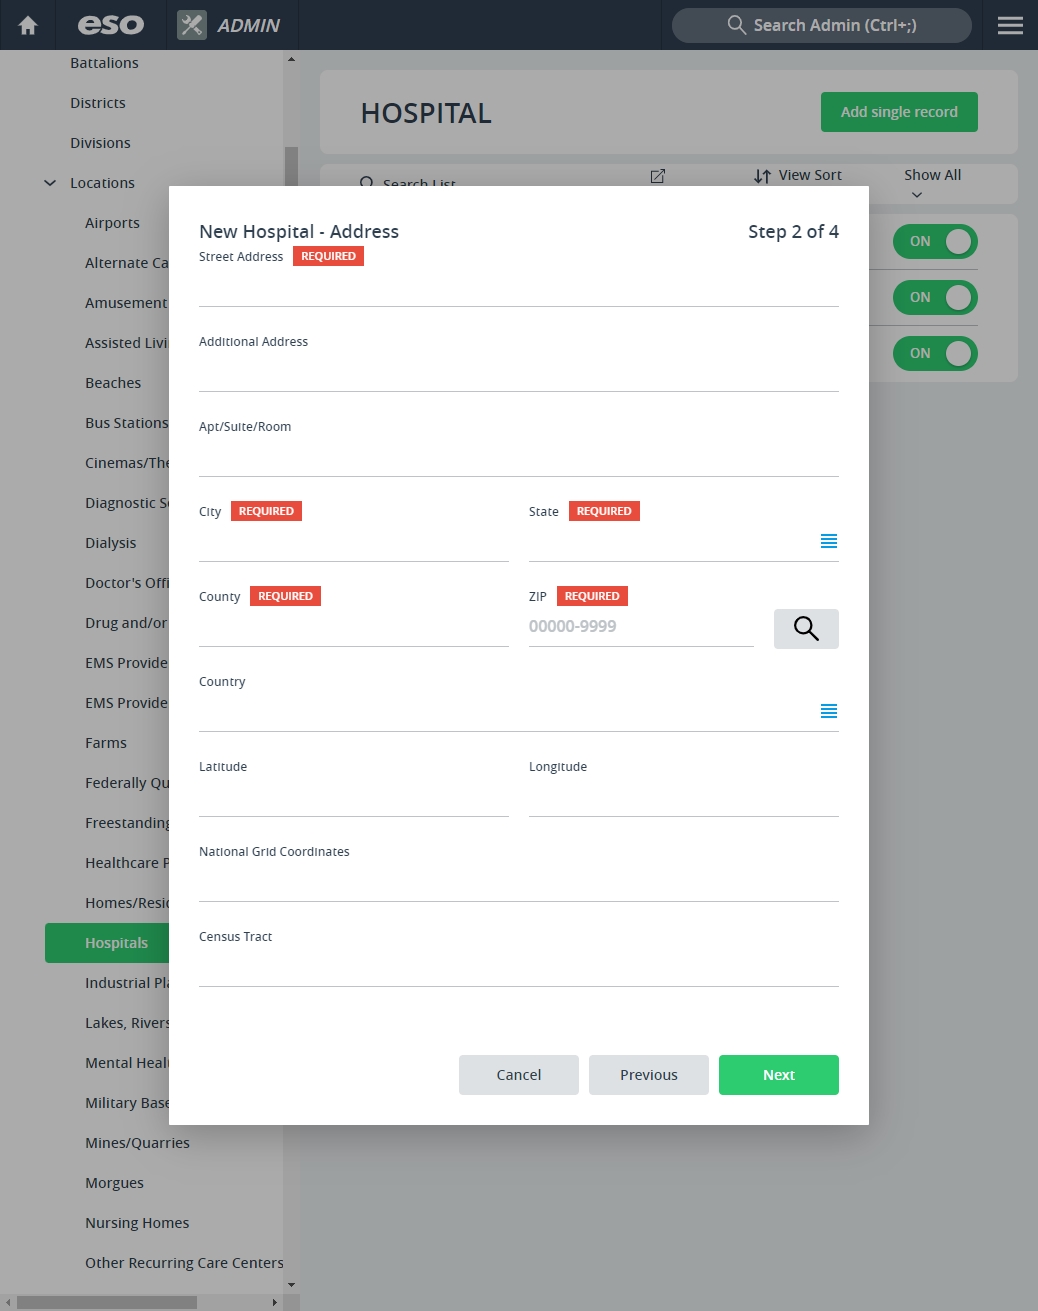
The next screen of the new location wizard appears, displaying the Address screen.

-
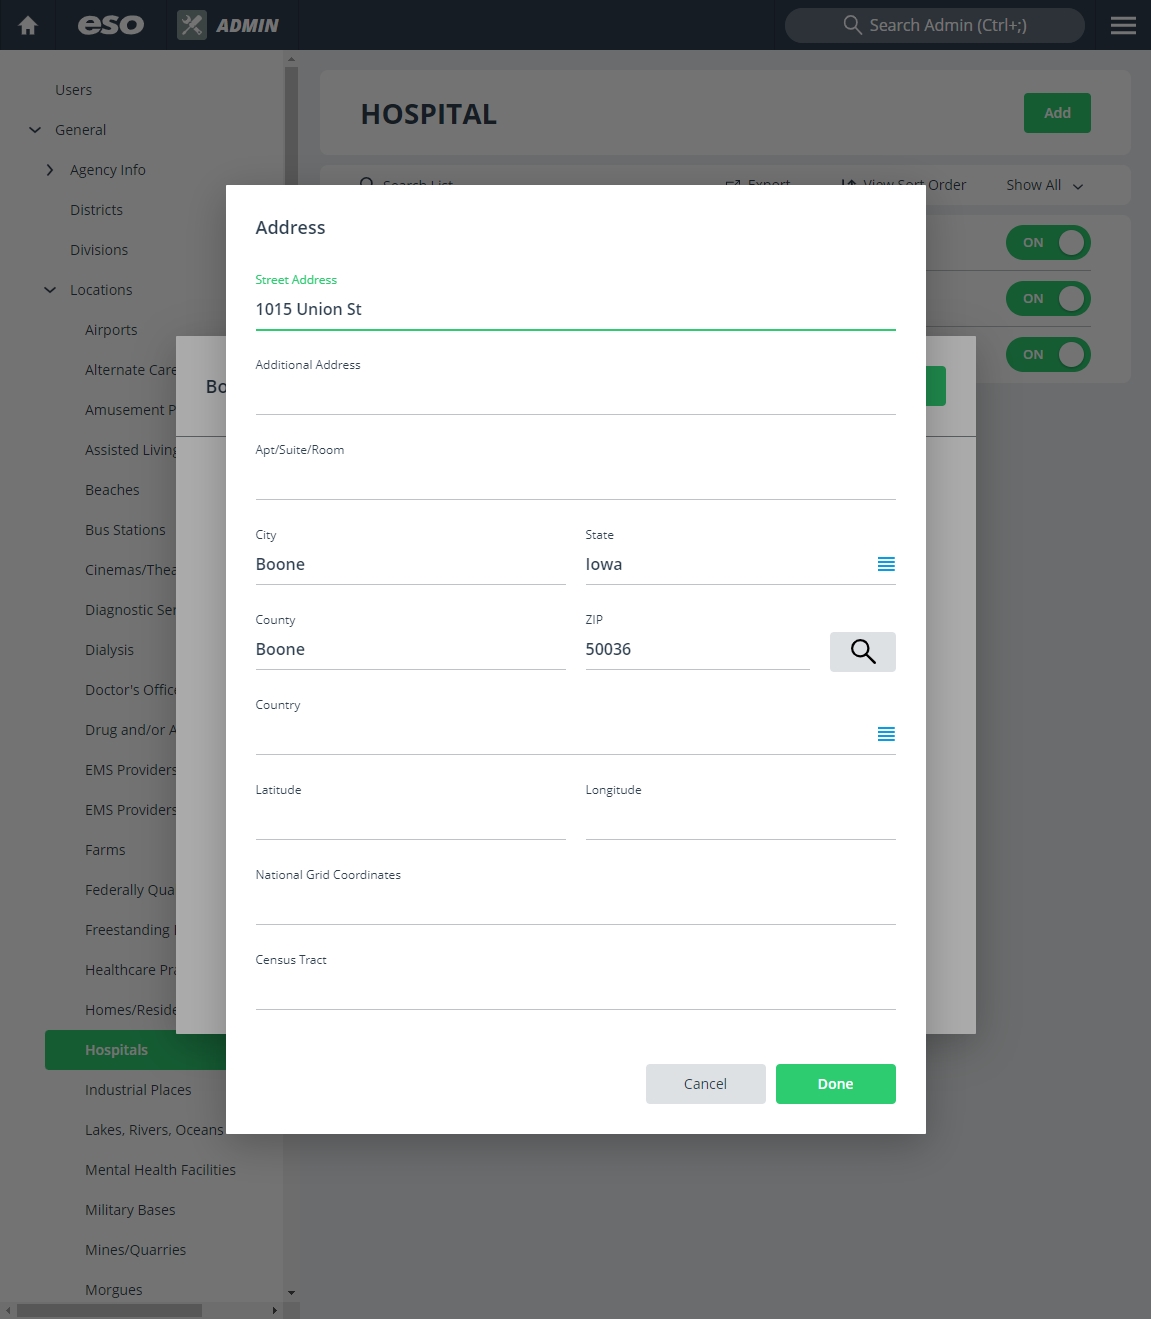
Specify address information.
- In Street Address, type the number and street name for the location.
- (If necessary) In Additional Address, type any additional number and street address needed for the location.
- (If necessary) In Apt/Suite/Room, type additional information for completing the location's street address.
-
In Zip, type the zip code for the location, then click the search icon (magnifying glass).
A list of cities, states, or zip codes matching what you entered appears.
Example: In Zip, type
50248, then click the search icon.A list of zip codes matching
50248appears on the right.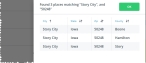
-
Select the entry that corresponds to the rest of the address you are entering.
The rest of the information from that match automatically populates the City, State, and County fields.
- From Country, click the field or the list icon to the right of the field, then select the appropriate single option from the menu that appears.
-
Specify the location using latitude and longitude coordinates
GPS coordinates are a unique identifier for a precise geographic location on the Earth, usually expressed in alphanumeric characters. GPS coordinates are usually expressed as the combination of degree-based latitude and longitude values.
When looking at a map, latitude lines (parallels) run horizontally. Each degree of latitude is approximately 69 miles (111 km) apart; there is a variation due to the fact that the earth is an oblate ellipsoid (slightly egg-shaped). Degrees latitude are numbered from 0° to 90° north and south. Zero degrees is the equator, the imaginary line which divides our planet into the northern and southern hemispheres. 90° north is the North Pole and 90° south is the South Pole.
The vertical longitude lines (meridians) converge at the poles and are widest at the equator (about 69 miles or 111 km apart). Zero degrees longitude is located at Greenwich, England (0°, the Prime Meridian). The degrees continue 180° east and 180° west where they meet and form the International Date Line in the Pacific Ocean. Greenwich is the site of the Prime Meridian.
-
Specify the latitude and longitude values in one of these formats.
In DMS
-
In Latitude and Longitude, type the number of degrees from 0° (the equator or the Prime Meridian, respectively), minutes from the degree to the location, and seconds from the minute to the location.
There are 60 minutes in each degree, and 60 seconds in each minute.
Example: The United States capitol is located at 38°53'23"N , 77°00'27"W (38 degrees, 53 minutes, and 23 seconds north of the equator and 77 degrees, no minutes and 27 seconds west of the meridian passing through Greenwich, England).
In DD
Decimal degrees are an alternative to using DMS. Decimal degrees express latitude and longitude geographic coordinates as decimal fractions and are used in many GIS, web mapping applications such as Google Maps, and GPS devices. As with latitude and longitude, the values are bounded by ±90° and ±180° respectively.
Positive latitudes are north of the equator, negative latitudes are south of the equator. Positive longitudes are east of Prime Meridian, negative longitudes are west of the Prime Meridian.
-
In Latitude and Longitude, type the decimal fraction of the latitude and longitude portions of the geographic coordinates of the location, respectively).
Example: The United States capitol is located at 38.889722°, -77.008889°.
-
-
-
In National Grid Coordinates, type the USNG coordinates.
The USNG is a point reference system of grid references commonly used in the United States. This system uses a "read right and then up" convention, where you measure to the East and then North in linear increments. The coordinates translate to distance in meters.
More information about the USNG.
A USNG spatial address is broken down into three parts:
-
The grid zone designation, for a world-wide unique address.
-
The 100,000-meter square identification, for regional areas.
-
The grid coordinates, for local areas.
A complete USNG spatial address provides a unique value and is necessary for use with GPS receivers and GIS.
Grid coordinates are used to define point features, such as a neighborhood, soccer field, a particular house, or even a parking place. These require different levels of granularity.
Example:
Number of digits Example Locates with precision 4 2306 A neighborhood-size area 6 234064 A soccer field-size area 8 23480647 The size of a modest home 10 2348306479 One meter (within a parking spot) -
-
In Census Tract, type the census tract number of the location.
Note: Not all jurisdictions have census tract numbers.
A census tract number is a 6- to 11-digit number, assigned by the U.S. Census Bureau, that identifies an area of land within the United States.
Example:
48453045400 -
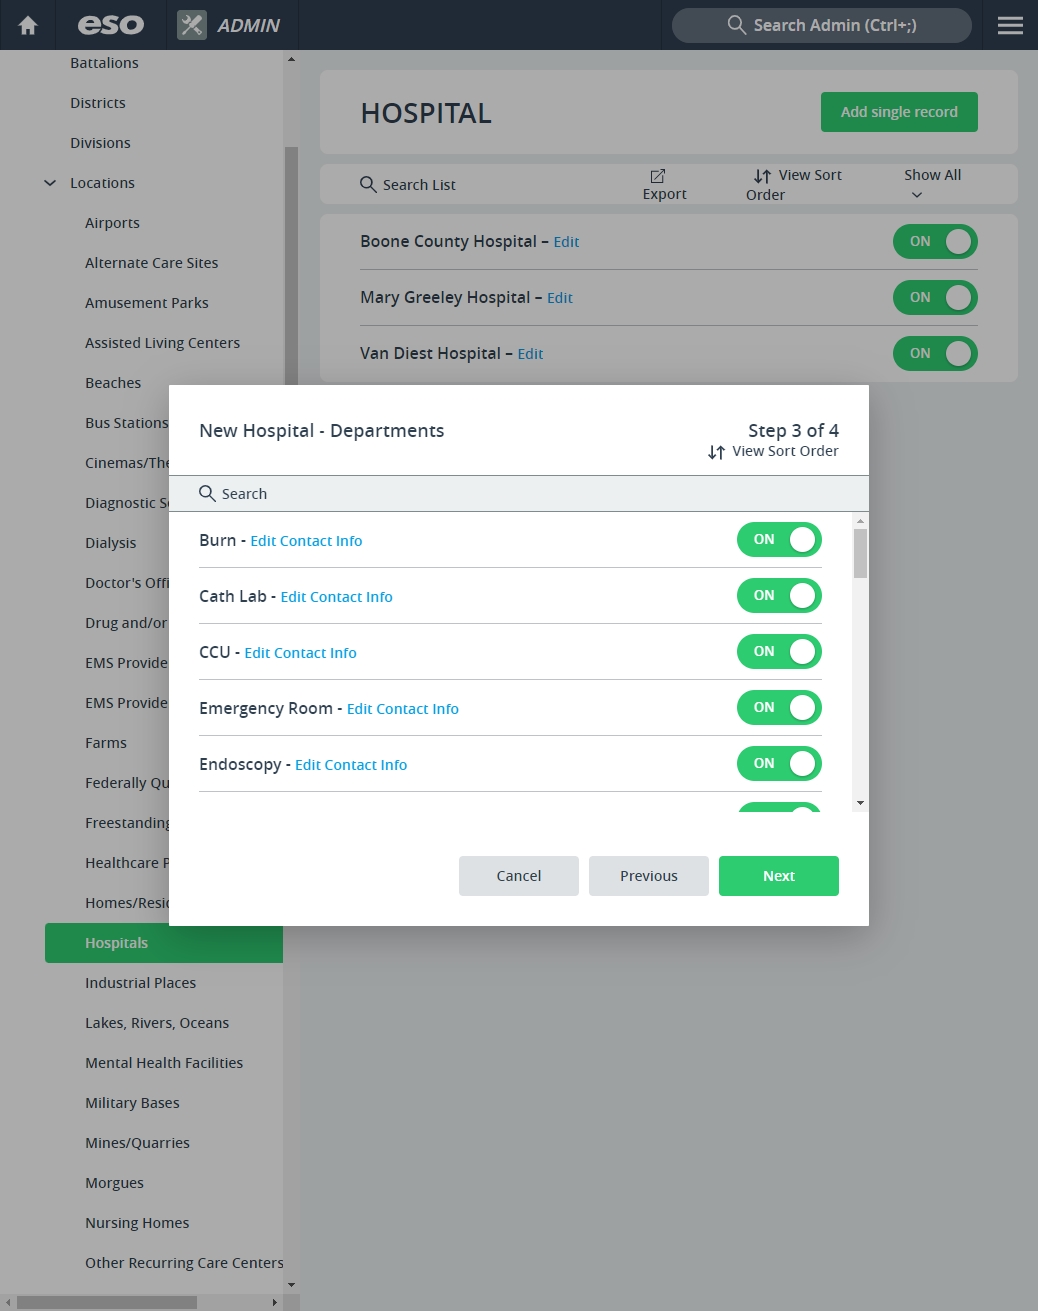
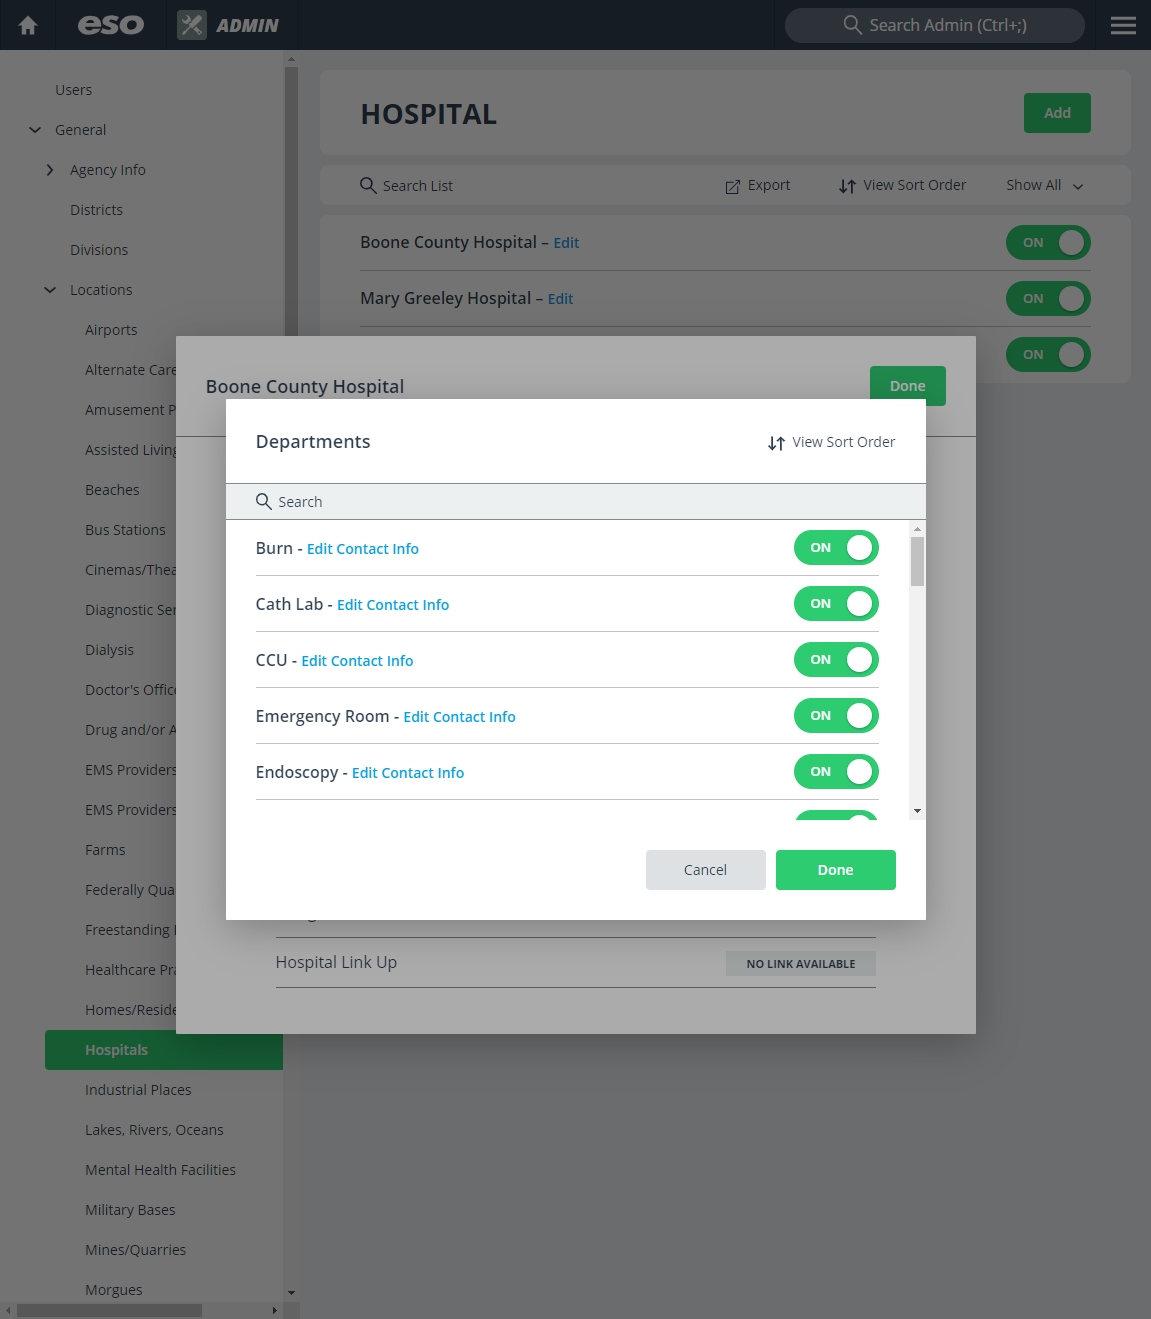
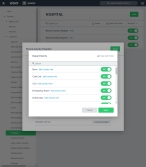
(Hospitals) Specify additional information.
Because hospitals have much more data to collect, when you select Hospitals as the location type, the wizard includes additional screens for listing hospital departments and designations.
-
List departments in the hospital.
-
Click Next.
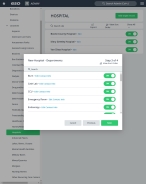
The next screen of the new location wizard appears, displaying the Departments screen. This is a NEMSIS-defined list of departments within a hospital that you can deliver the patient to.
-
Do any of the following.
Deactivate departments the hospital does not have.
You can tailor the list to display only the departments the hospital has, so that there is less chance of selection error by a medic in the field.
-
For the item you want to deactivate, on the right side of the list item, drag the slider button to the left, until Off appears.
The Edit link to the right of the item name disappears when the item is deactivated.
Note: While you are in the Admin module, deactivated items still appear in the list; in all other ESO Suite modules, deactivated items do not appear in the lists.
Video: Activate and deactivate a list item
Note: The process for activating and deactivating a list item shown below applies to any list in the ESO Suite.
Video: Activate and deactivate a list item
Note: The process for activating and deactivating a list item shown below applies to any list in the ESO Suite.
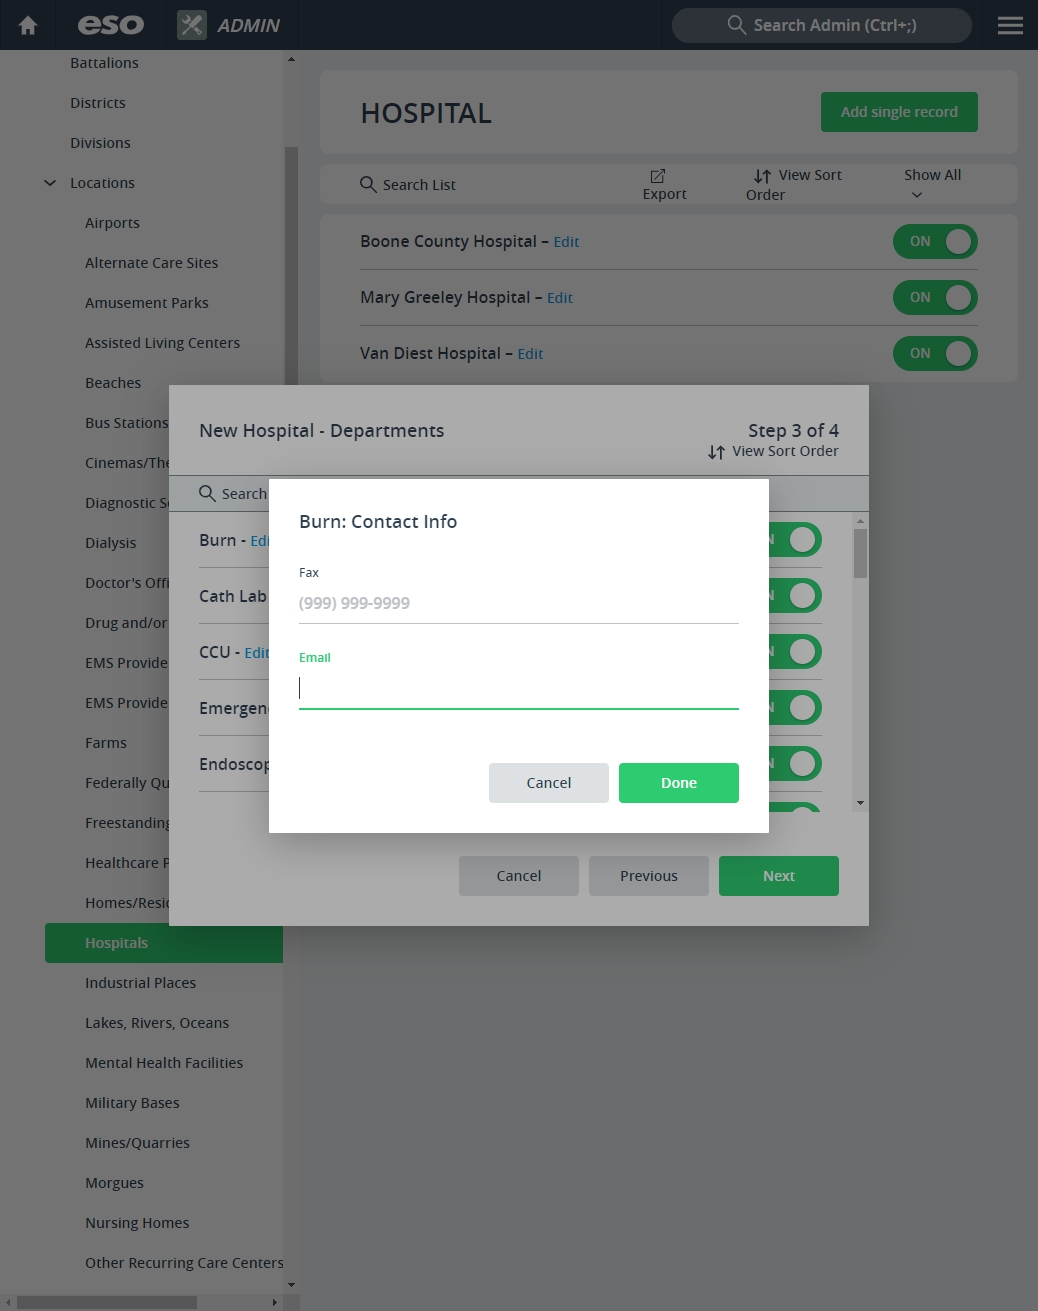
Specify department contact information.
-
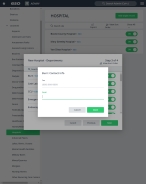
For each active department, click Edit Contact Info.
The Contact Info dialog box appears.
-
In Fax, type the FAX numbers for that specific department in the hospital.
Note: If you specify a department-specific FAX number, when the medic in the field selects the department’s FAX number, it overrides the main hospital FAX number, and the patient care report is sent directly to the department instead.
-
In Email, type an email address for that specific department.
Email addresses must be in the
name@domain.suffixformat.Example:
YourName@eso.comNote: If you specify a department-specific email address, when the medic in the field selects the department’s email address, it overrides the main hospital email address, and the patient care report is sent directly to the department instead.
- Click Done.
Search the department list.
-
In the Search field, type the characters in the name of the list item you need to find.
As you add each character, the list automatically reduces to only items containing that sequence of characters.
Video: Search a list
Note: The process for searching a list shown below applies to any list in the ESO Suite.
Sort the department list.
Note: Lists in the Admin module always appear in alphabetical order, and display both active and deactivated items.
-
In the upper right corner of the list, click View Sort Order.
The Sort dialog box appears.
Note: Only the active items in the list appear in the Sort dialog box.
-
For Sort list alphabetically, drag the slider button to the left, until Off appears.
You can now change the order of the values in the list, and buttons for manually sorting the list appear below Sort list alphabetically.

-
In the list on the right, select the item you want to move up or down in the list.
A green, right-pointing arrow appears next to the list item to confirm that it is selected.
- On the left, click the up or down arrows to move the item up or down one place, or to the top or bottom of the list.
- Repeat the previous two steps as many times as needed to arrange the items in the order you want in the list.
-
Click OK.
The dialog box closes, and the list appears in the new order, unless you are working in the Admin module.
Note: Lists in the Admin module always appear in alphabetical order.
Video: Sort a list
Note: The process for sorting a list shown below applies to any list in the ESO Suite.
-
-
-
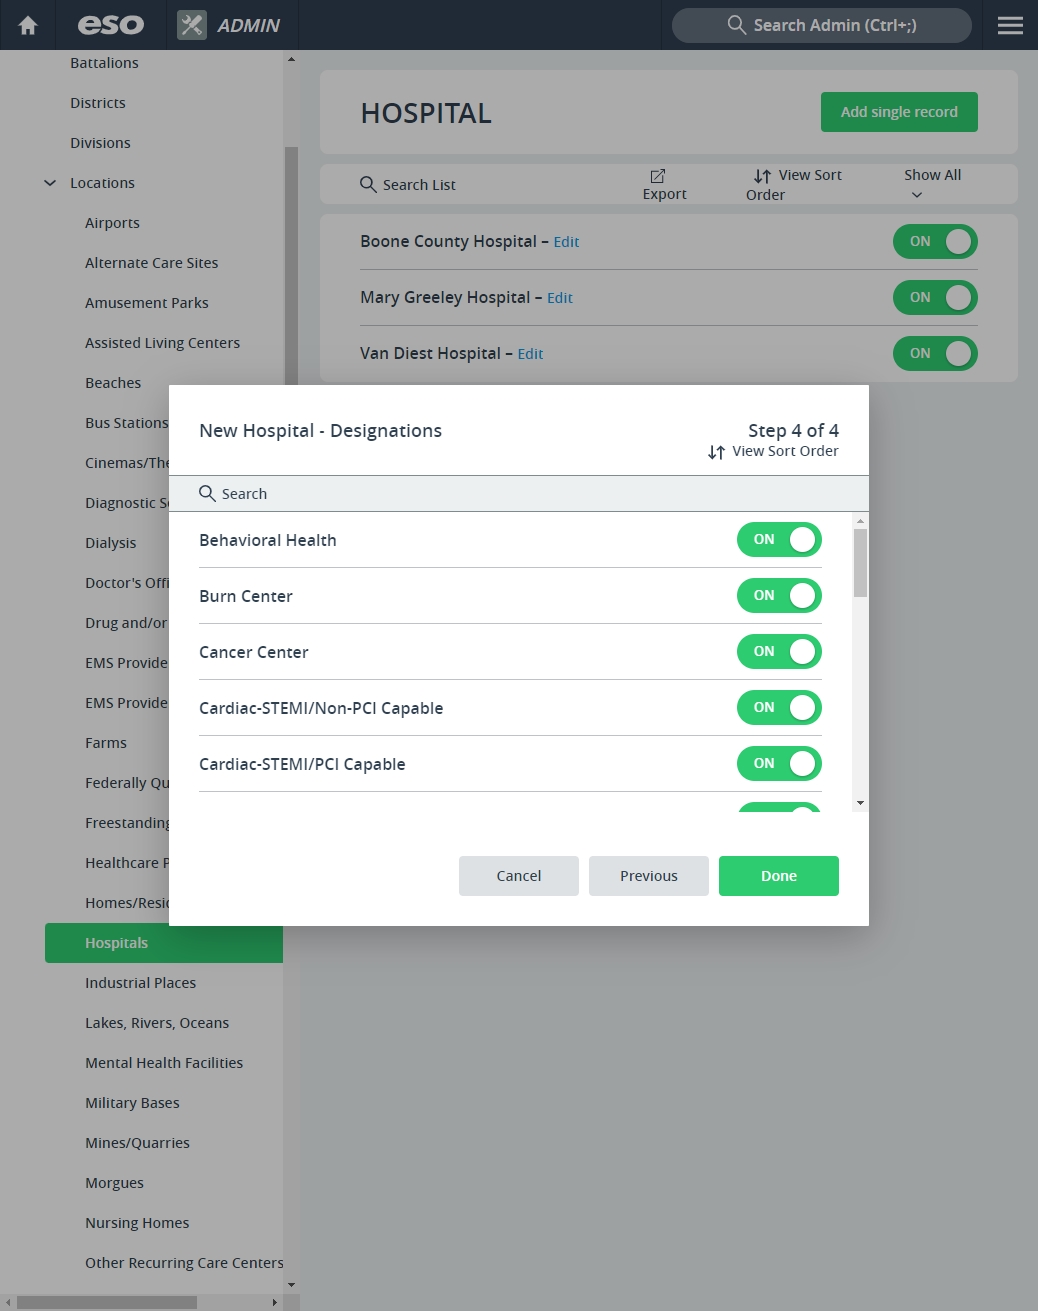
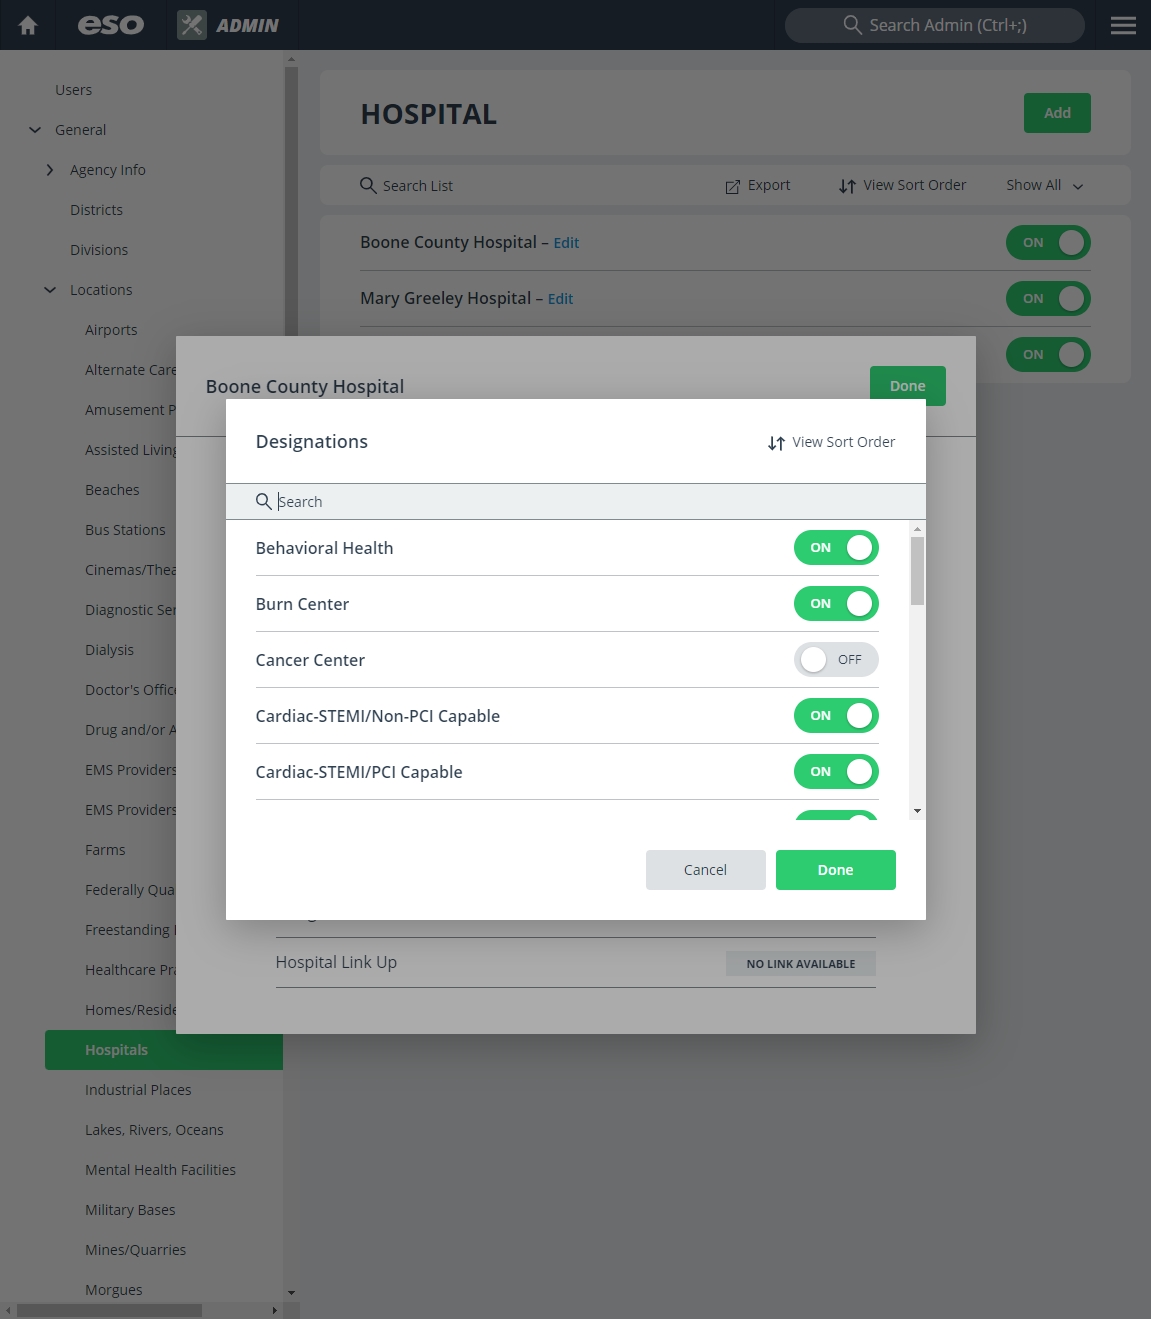
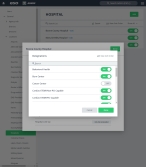
List designations (capabilities) the hospital has.
-
Click Next.
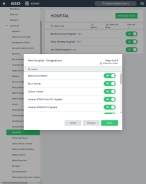
The next screen of the new location wizard appears, displaying the Designations screen. This is a list of the capabilities the hospital offers.
-
Do any of the following.
Deactivate designations the hospital does not have.
You can tailor the list to display only the designations the hospital has, so that there is less chance of selection error by a medic in the field.
-
For the item you want to deactivate, on right side of item in the list, drag the slider button to the left, until Off appears.
Note: In the upper right corner of the list, if you click View Sort Order, the list still displays deactivated items while you are in the Admin module. In all other ESO Suite modules, the deactivated items do not appear in the lists.
Video: Activate and deactivate a list item
Note: The process for activating and deactivating a list item shown below applies to any list in the ESO Suite.
Search the designation list.
-
In the Search field, type the characters in the name of the list item you need to find.
As you add each character, the list automatically reduces to only items containing that sequence of characters.
Video: Search a list
Note: The process for searching a list shown below applies to any list in the ESO Suite.
Sort the designation list.
Note: Lists in the Admin module always appear in alphabetical order, and display both active and deactivated items.
-
In the upper right corner of the list, click View Sort Order.
The Sort dialog box appears.
Note: Only the active items in the list appear in the Sort dialog box.
-
For Sort list alphabetically, drag the slider button to the left, until Off appears.
You can now change the order of the values in the list, and buttons for manually sorting the list appear below Sort list alphabetically.
-
In the list on the right, select the item you want to move up or down in the list.
A green, right-pointing arrow appears next to the list item to confirm that it is selected.
- On the left, click the up or down arrows to move the item up or down one place, or to the top or bottom of the list.
- Repeat the previous two steps as many times as needed to arrange the items in the order you want in the list.
-
Click OK.
The dialog box closes, and the list appears in the new order, unless you are working in the Admin module.
Note: Lists in the Admin module always appear in alphabetical order.
Video: Sort a list
Note: The process for sorting a list shown below applies to any list in the ESO Suite.
-
-
-
- Click Done.
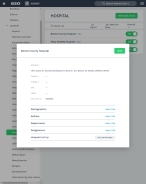
Edit a location.
-
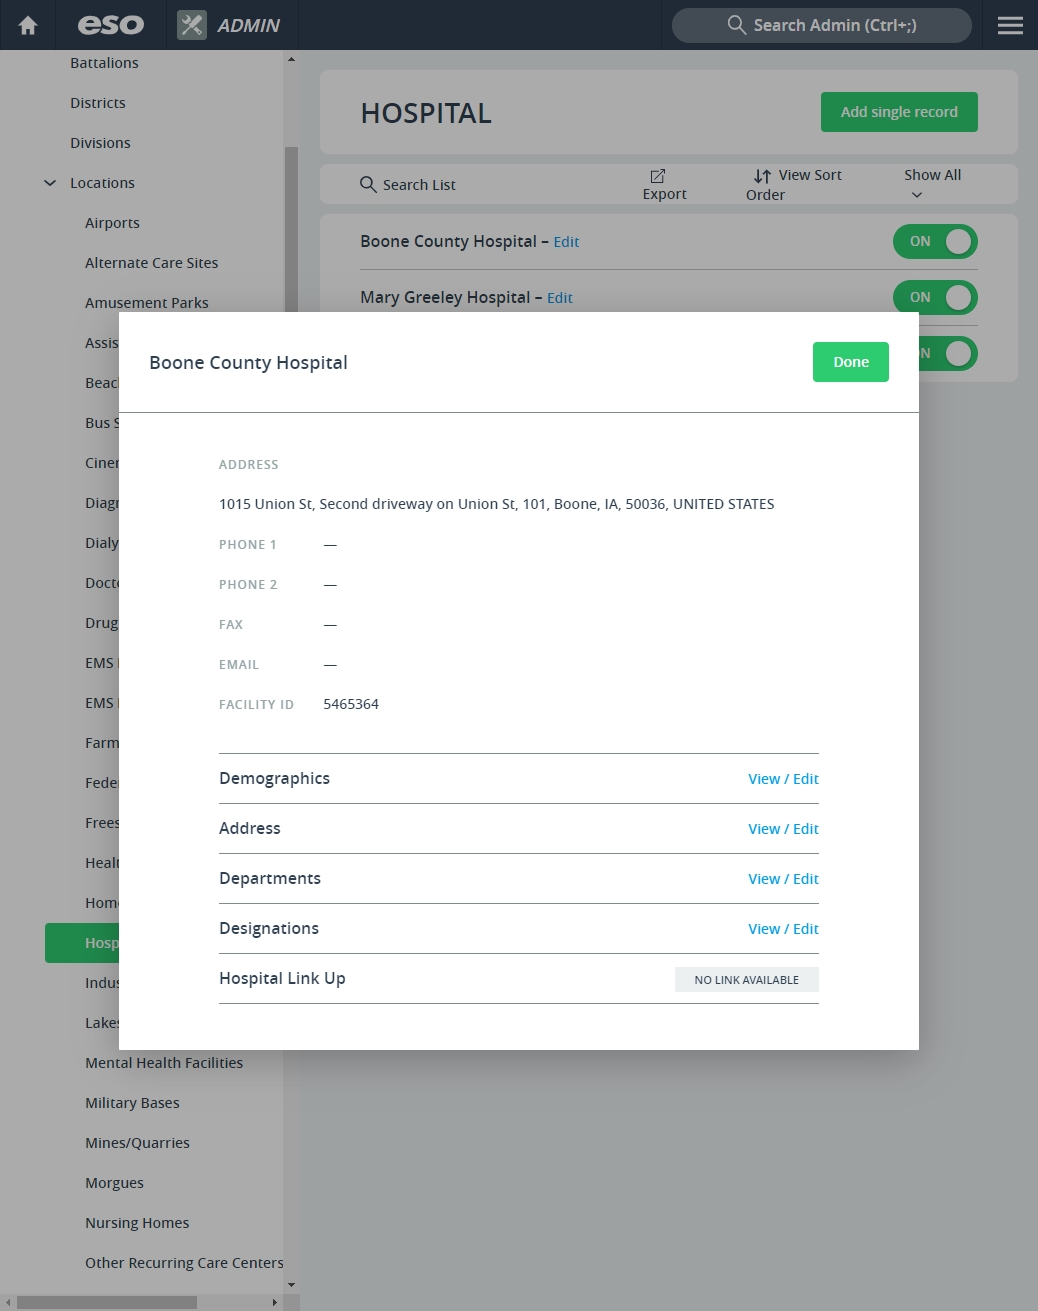
For the list item you want to edit, click Edit to the right of the item name.
A dialog box appears, displaying a summary values already specified for that list item, and providing links for editing those values.
-
(All location types) Do any of the following.
Edit the demographics.
-
For Demographics, click View / Edit.
The Demographics dialog box appears, displaying the information already entered for that list item.
- Change the information in the fields as needed.
- Click Done.
Edit the address.
-
For Address, click View / Edit.
The Address dialog box appears, displaying the information already entered for that list item.

- Change the information in the fields as needed.
- Click Done.
-
-
(Hospitals only) Do any of the following.
Edit departments.
-
For Departments, click View / Edit.
The Departments dialog box appears, displaying the information already entered for that list item.
- Deactivate or activate hospital departments as needed.
- Edit contact information for departments as needed.
- Click Done.
Edit designations.
-
For Designations, click View / Edit.
The Designations dialog box appears, displaying the information already entered for that list item.
- Deactivate or activate hospital designations as needed.
- Click Done.
-
Deactivate a location.
-
For the item you want to deactivate, on the right side of the list item, drag the slider button to the left, until Off appears.
The Edit link to the right of the item name disappears when the item is deactivated.
Note: While you are in the Admin module, deactivated items still appear in the list; in all other ESO Suite modules, deactivated items do not appear in the lists.
Video: Activate and deactivate a list item
Note: The process for activating and deactivating a list item shown below applies to any list in the ESO Suite.
Sort the location list.
Note: Lists in the Admin module always appear in alphabetical order, and display both active and deactivated items.
-
In the upper right corner of the list, click View Sort Order.
The Sort dialog box appears.
Note: Only the active items in the list appear in the Sort dialog box.
-
For Sort list alphabetically, drag the slider button to the left, until Off appears.
You can now change the order of the values in the list, and buttons for manually sorting the list appear below Sort list alphabetically.
-
In the list on the right, select the item you want to move up or down in the list.
A green, right-pointing arrow appears next to the list item to confirm that it is selected.
- On the left, click the up or down arrows to move the item up or down one place, or to the top or bottom of the list.
- Repeat the previous two steps as many times as needed to arrange the items in the order you want in the list.
-
Click OK.
The dialog box closes, and the list appears in the new order, unless you are working in the Admin module.
Note: Lists in the Admin module always appear in alphabetical order.
Video: Sort a list
Note: The process for sorting a list shown below applies to any list in the ESO Suite.
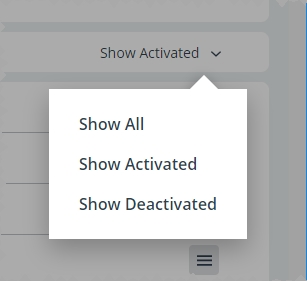
Filter the location list.
-
On the right side of the screen, click the filter menu.
Note: The name of the menu varies, reflecting the option currently selected for filtering the list. Show All appears as the default selected option.
The menu of filter options appears.
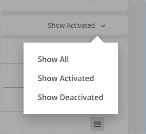
-
Select the option you want to use to filter the list.
The list updates to reflect your selection.
Video: Filter a list
Note: The process for filtering a list shown below applies to any list in the ESO Suite.
Search the location list.
-
In the Search field, type the characters in the name of the list item you need to find.
As you add each character, the list automatically reduces to only items containing that sequence of characters.
Video: Search a list
Note: The process for searching a list shown below applies to any list in the ESO Suite.
Export the location list to a .csv file.
-
In the upper right corner of the list, click Export.
The Admin module generates a
.csvfile containing all the items in the list, whether they are activated or deactivated, and regardless of how you are filtering the list. The.csvfile downloads to your default download location.
-