Understand the interface and data entry in it
Once you have logged into FH Medic, the screen that appears is organized into several discrete components:
- Tabs for organizing data into large groups
- Buttons for accessing multiple pages of fields
- Fields for data entry
- A button to return to the incident list and map
- Buttons to take photos, check data, view a summary, print, and access quick buttons
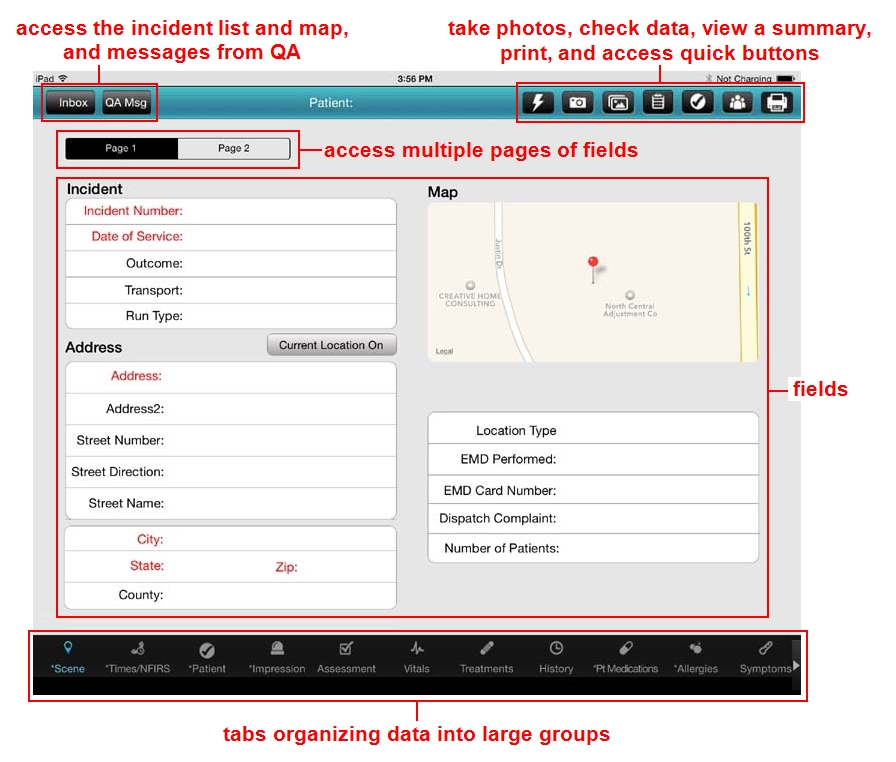
Tabs with an asterisk (*) in their name and fields with red text indicate required information when entering data for an incident.
Note: As soon as you enter data, it is relayed to the server using a wireless connection, eliminating the need to "save" data as you work.
FH Medic is set up to help you enter data as quickly and efficiently as possible by grouping the data on tabs and by related fields. Tabs and fields with red text indicate required information when entering data for an incident.
When you touch a field, depending on the type of data needed for the field and whether pre-defined values already exist in FH Medic, one of the following things appear for data entry.
A keyboard appears on the screen, which you can use to enter the value needed, and then touch Next in the keyboard.
After you touch Next, if the system requires only a single value for the field, FH Medic automatically moves on to the next field.
Example: If you touch Incident Number, the iPad keyboard appears, and you can type in the number for the incident and touch Next to advance to the Date of Service field.

Tip: If you do not want to enter a value for the field, you can leave the field blank and touch the keyboard collapse icon  on the keyboard.
A list of pre-defined choices for the field appears in a menu next to the field. If you drag your finger up or down in the menu, you can scroll up or down through the list of options available.
Depending on whether one or more pre-defined values are permitted for a field, differences in the menu occur.
Only a list of options appears in the menu.
Example: If you touch Outcome, a list of the possible patient outcomes from an incident appears in a menu next to the field.

As soon as you touch a value from the list of pre-defined values, the menu closes, the option you select appears as the value in the field, and FH Medic automatically moves on to the next field.
If you want to remove an existing selection from the field (return it to a blank state), touch the field, then touch Clear Selection.
Done appears at the top of the menu.
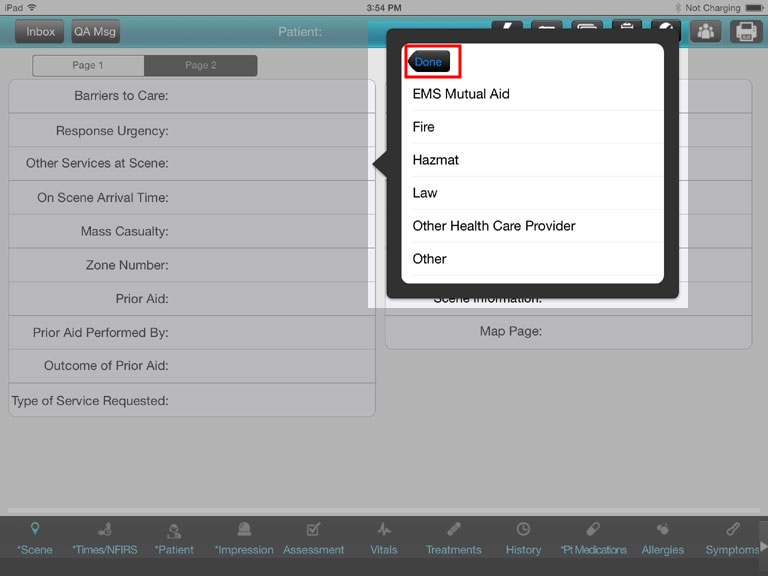
Depending on what screen you are on in FH Medic, different things can happen when you touch an option in the menu.
-
A simple blue check mark appears to indicate that you selected the option.
Selecting the option a second time clears the selection.
-
A green circle with a check mark appears to indicate that you selected the option. If you touch the menu option a second time, a red circle with an X appears to indicate the selection does not apply for the field.

Selecting the option a third time clears the selection.
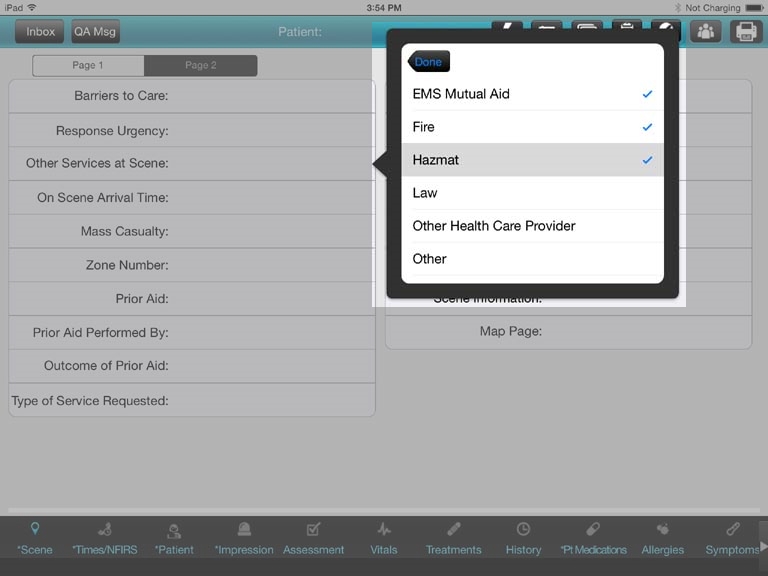

When you have selected all the options you need for the field, touch Done. The list of selections appears in the field, separated by commas. If you had touched any of the option twice (a red circle with an X appeared in the menu), the selection is prefixed in the field by NO, to indicate the selection does not apply for the field (example: NO Anemia). FH Medic automatically moves on to the next field.
A menu containing a date roller appears on the screen.
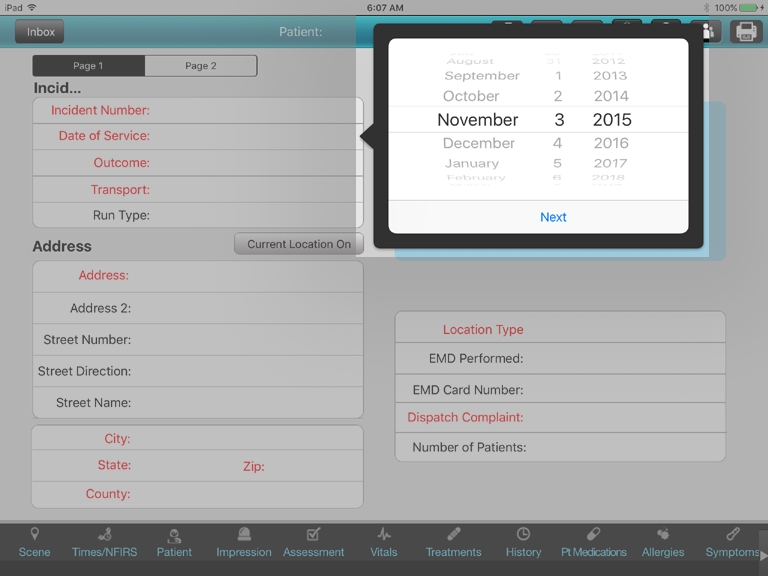
- Touch the month column, and then move your finger up or down in the column to move the list of months up or down until the month you want appears in bold black text.
- Touch the date column, and then move your finger up or down in the column until the day of the month you want appears in bold black text.
- Touch the year column, and then move your finger up or down in the column until the year you want appears in bold black text.
-
Touch Next.
The menu closes, and the date components you selected appear in the field.
Depending on what you touch, one of the following happens.
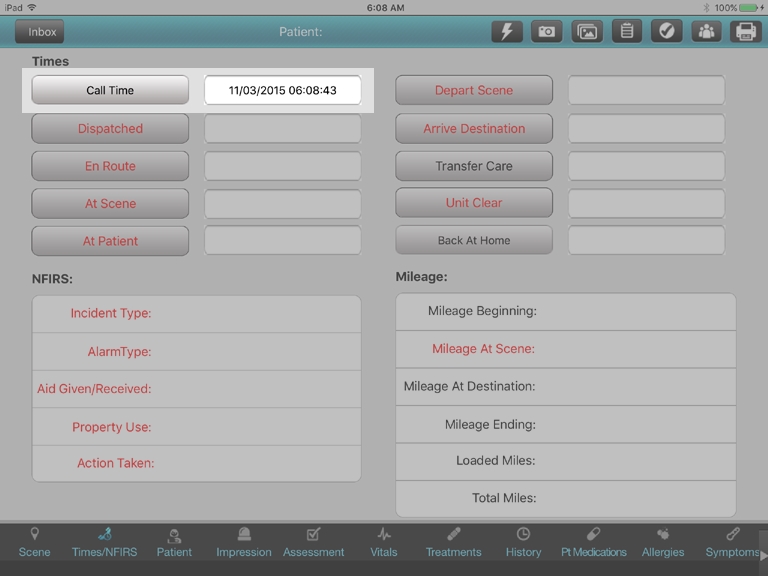
Example: On the Times/NFIRS tab, touch Dispatched.
The current system time on your computer appears in the field to the right of the button.
A menu containing a numeric keypad and several shortcut buttons appears on the screen. At the top of the keypad, a field displays the current date and a time.
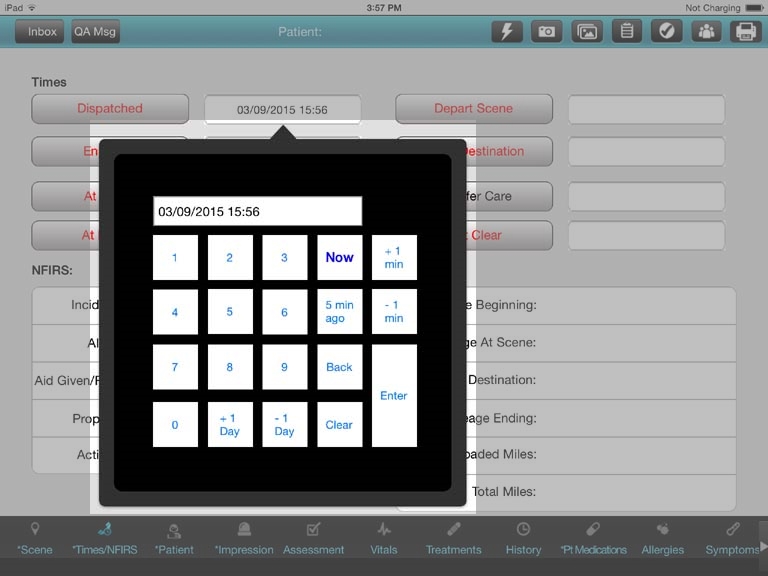
- (Optional) Touch Clear, and then touch the number buttons to re-enter a date and time.
- (If necessary) Touch Back as many times as needed to erase the time and date values, one digit at a time, as far back as needed, and then touch the number buttons to enter new digits.
-
Do any of the following.
- Touch Now to enter the current system time on your computer.
- Touch 5 min ago or 10 min ago to enter the current system time on your computer, minus five or ten minutes, respectively.
- Touch +1 Day or -1 Day to adjust the date forward or backward one day, respectively.
- Touch the number buttons to enter a time.
- Touch Enter to use the date and time displayed in the field at the top of the keypad as the value for the field.
Pre-defined values in FH Medic are set up by the FH Medic administrator. Information on defining these values is available in the FH Medic Administrator's Guide .