View a geocoded address on a map
-
Depending on which module you want to view an address from, do one of the following.
 Occupancy
- Begin a new occupancy record as normal.
- On the Address tab, click Show on Map.
EMS
- Begin a new EMS record as normal.
- On the Basic tab, under Address Type, choose the option that best describes the address you will enter.
-
On the right side of the tab, click Show on Map.
Dispatch (remote station incident report)
- Begin a new dispatch remote station incident report record as normal.
- On the Basic tab, under Address Type, choose the option that best describes the address you will enter.
-
On the right side of the tab, click Show on Map.
Hydrant
- Begin a new hydrant record as normal.
-
In the top center of the tab, click Show on Map.
Station lookup
-
Choose Tools → Lookup Tables.
The Lookup Tables dialog box appears.
- Expand System-Wide Codes, and then select Stations.
-
Click Setup.
The Lookup - Stations dialog box appears.
-
Click New.
The Code for Stations dialog box appears.
- In the upper right corner of the dialog box, click Show on Map.
Incident
- Begin a new incident record as normal.
- On the Basic tab, under Address Type, choose the option that best describes the address you will enter.
-
On the Basic tab, on the right side of the tab, click Show on Map.
Wildland fire
- Begin a new incident record as normal.
- On the Basic tab, under Address Type, choose the option that best describes the address you will enter.
- Click the Additional Reports tab.
-
Near the bottom of the tab, click Wildland Fire.
The Wildland Fire Report dialog box appears.
-
On the Scene tab, click Show on Map.
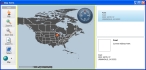
The Map Item dialog box appears, displaying the address on the map.
-
(Optional) Change the view of the address on the map in one of these ways.
Automatically zoom to the address
-
Choose Map → Zoom to All or Map → Zoom to Selected.
The zoom level on the map changes as needed to display the address from 2000 feet (1:24,000). Because there is only one address, and because it is selected by default, Zoom to All and Zoom to Selected have the same results in the Map Items dialog box.
Automatically pan to the address
-
Choose Map → Pan to Selected.
The view of the map shifts (pans) as needed at the current zoom level to display the address. Because there is only one address, it is selected by default.
Manually zoom to the address
You can zoom in or out on the map in any of these ways.
- Click Zoom In or Zoom Out, and then click on the map to move closer to or further away from the Earth.
-
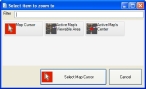
Click Zoom To, and then in the menu that appears, select a specific distance to zoom in or out to.
If you select Map Item in the menu, the Select item to zoom to dialog box appears, and you can select one of the zoom options in the dialog box.
The map view changes correspondingly each time you click the map.
Manually pan to the address
- Click Pan, place the mouse pointer on the map, and then drag the mouse in any direction to move the view in the corresponding direction, until you can see the location of the address on the map.
Note: Because there is only one address in the dialog box, and the address is selected by default, you do not need to use the Select icon in the left pane.
-

