Build the session names list
Note: You must have the full version of PM to build the session names list.
For information on upgrading to the full version of PM, go to https://www.eso.com/pm-demo/ and fill out the fields to request a demonstration and speak with a sales representative.
While short classes are often only a single session long, a longer class is often broken up into two or more sessions, so that different topics can be their own session, with different credits associated with them or so that different groups of attendees can be recorded against different class sessions. This is useful when the same content is repeated for each shift, or when classes have some of the same sessions in them because the content is applicable to more than one class.
Example: A class on operating department apparatuses might include separate sessions on driving tanker trucks, ladder trucks, ambulances, engines, Gators, watercraft, and so forth. A different class on fighting wildland fires might also include the same sessions on driving tanker trucks and Gators.
You can build a list of these sessions, which can also include information such as a session description, objective, and an indication of whether or not the session is required in a class. The sessions you define appear as menu options for the Session Name field when you are adding sessions to a class.
|
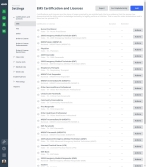
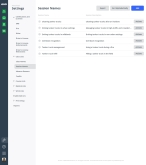
Example: The session menu options you enable on the Settings > Class Lists > Session Names screen appear when you click the Session Name field in the PM module. |
-
 (If you have not done so already) Access the PM or PM Basic module in the ESO Suite.
Which version of the module opens depends on whether your agency or department has purchased the PM Basic or full version of the PM module.
-
Do one of the following.
-
(If you are already working in the ESO Suite) Click the Home icon in the upper left corner of the screen.
-
 (If you have not yet logged in) Log in to the ESO Suite.
-
In a web browser, go to https://www.esosuite.net/EsoSuite.
The ESO Suite login screen appears.
-
Enter your user name, password, and agency name, then click Let's Go.
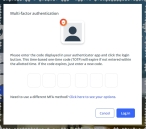
If MFA is enabled, the Multi-factor authentication dialog box appears, displaying one or more methods you can use to verify your login credentials. The number of methods that appear in the dialog box depends on what MFA methods your ESO Suite administrators enabled in the Admin module.

Click graphics
to open them.Information on enabling MFA and specific MFA methods is available in the Admin module online help, in Configure multiple-factor authentication.
Note: If your ESO Suite administrators have disabled MFA ("opted-out"), this dialog does not appear.
-
(If the Multi-factor authentication dialog box appears) Depending on which buttons appear in the dialog box, verify your login in one of the following ways.
 With an authenticator application.
-
Click MFA verification via authenticator app.
The dialog box updates with boxes for entering the numbers of the authentication code, and the ESO Suite sends an authentication code to the authenticator application installed on your device.
-
Open your authenticator application and note the authentication code currently displayed.
-
Enter the authentication code displayed in the authenticator application.
-
Click Log In.
 With a text message (SMS).
-
Click MFA verification via SMS.
The dialog box updates with boxes for entering the numbers of the authentication code, and the ESO Suite sends an authentication code to the phone number recorded in your PM records and identified with MFA codes.
-
Enter the authentication code sent to your MFA-registered phone number.
-
Click Log In.
 With an email message.
-
Click MFA verification via email.
The dialog box updates with boxes for entering the numbers of the authentication code, and the ESO Suite sends an authentication code to your agency or department email address, recorded in your PM records.
-
Enter the authentication code sent to your agency or department email address.
-
Click Log In.
-
-
The ESO Suite landing screen appears.

Click graphics
to open them.Note: If MFA is enabled, you can access and manage your MFA options through the PM module, on the Settings > Account page, as described in Manage a user account. If your agency or department has enabled MFA but has not purchased the full-featured version of the PM module, you can access your own MFA settings by clicking Change my Multi-Factor Authentication settings on the landing screen, then using the Settings > Account page that appears. If your agency has not enabled MFA, the Change my Multi-Factor Authentication settings link does not appear on the landing screen.
-
-
On the top side of the home screen, click PM.
Tip: If your screen or browser window is too narrow to display all your agency's ESO Suite module icons, an options icon appears on the right side of the icon bar. If you click the options icon, a menu appears containing additional module icons.
A list of all the personnel in the PM module appears, displayed in a grid format.
PM (full version) PM Basic Note: If you can access the full-featured PM module, you can view all your own information in it. The amount of information you can edit in the PM module depends on what roles and permissions your ESO Suite administrator assigned to your user account.
Information on user accounts, roles, and permissions is available in Manage a user account.
-
-
In the left pane, near the bottom, click the Settings icon.

If you have the necessary permissions assigned to your ESO Suite user roles to configure settings, the Settings screen appears. The list of features that appears in the left pane reflects your permissions to access and configure the PM module
Click graphics
to open them. -
In the left pane, expand Class Lists, then click Session Names.
The Session Names screen appears, listing any sessions already defined.
-
Work with the list of sessions in any of the following ways.
 Add a session.
-
In the upper right corner, click Add.
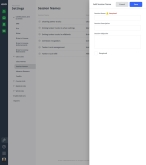
The Add Session Name dialog box appears.
- In Session Name, type the name of the session you are creating.
-
In Session Description, type a description of what this session of the class covers.
Example:
Driving tanker trucks in non-urban settings. -
In Session Objective, type a description of what take-away knowledge the personnel should after attending the session.
Example:
Learn how to drive a tanker truck in off-road environments to assist in combating a wildland fire. - Select or clear Required to indicate whether or not this session is required in a class.
-
Click Save.
The session you added appears as a new listing on the Session Names screen.
The next time you add a session to a session record, this new session appears as an option in the Session Name field's menu.
 Disable or enable a session.
You can disable a session, so that the corresponding menu option does not appear in other areas of the PM module. You can always re-enable a session later, if needed.
-
On the right side of the listing, click Actions, and choose Disable.
A red Disabled label appears to the left of the session, and the session moves to the bottom of the list.
-
On the right side of the listing, click Actions, and choose Enable.
This option appears only if you disabled the session in the past.
The red Disabled label disappears to the left of the session, indicating that the session will appear again as a menu option in other areas of the PM module.
 Sort the sessions list alphabetically.
You can sort the list alphabetically to help find an item quickly.
-
In the upper right corner of the screen, click Sort Alphabetically.
The list sorts from A-Z.
 Change the list order.
Because some sessions occur more frequently, you can sort the order of sessions in the list for convenience when adding sessions to a class.
Example: In a rural fire department, it is common for personnel to be trained in driving tanker trucks to haul water to a remote fire scene. It is convenient to have the Driving tanker trucks in wildlands option appear at or near the top of the session names list, for easy selection when adding sessions to a class.
-
 Video: Order the sessions name list
Note: While the video below demonstrates changing the order of items in the immunizations list, the same drag-and-drop process applies to all module lists where you change the list order.
Note: The list order in the Settings > Session Names screen determines the list order in the Session Name field elsewhere in the PM module. Disabled values on the Settings > Session Names screen do not appear for this field.
-
-
 (Optional) Export the session names list.
You can export a list of all the session names currently listed in the module, regardless of whether they are enabled or disabled. The list exports to a comma-separated values (*csv) file, which may be read with Microsoft Excel or other software applications, and includes the name, description, and objective for each session.
-
In the upper right corner of the screen, click Export.
The file downloads to the default download location, and saves with the file name
ESO_DataTypeDate.csv.
-


