Set application list visibility in other ESO Suite modules
Application lists are lists of personnel or staff members who are qualified to do a particular job, and whose name you want to appear as an selectable choice in other modules in the ESO Suite. These lists of personnel or staff members appear in several ESO Suite modules, such as the EHR, Fire Incidents, and Patient Registry modules. The roles and permissions your ESO Suite administrator assigned to your user account, determines what modules you can access as a user, and what actions you can perform with those modules.
Being able to control application lists lets you limit the list of personnel that appear as options to only those qualified for a particular job.
Example: Your department or agency may have dozens of personnel, but only a handful of them are qualified as fire fighters and can respond to a fire incident. When you are filling out a fire incident report, it reduces potential error if only the qualified personnel, identified as available to appear in the Fire module appear, can be selected from personnel lists.
Information on user accounts, roles, and permissions is available in Manage a user account.
-
 (If you have not done so already) Access the PM or PM Basic module in the ESO Suite.
Which version of the module opens depends on whether your agency or department has purchased the PM Basic or full version of the PM module.
-
Do one of the following.
-
(If you are already working in the ESO Suite) Click the Home icon in the upper left corner of the screen.
-
 (If you have not yet logged in) Log in to the ESO Suite.
-
In a web browser, go to https://www.esosuite.net/EsoSuite.
The ESO Suite login screen appears.
-
Enter your user name, password, and agency name, then click Let's Go.
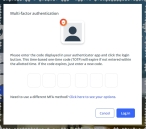
If MFA is enabled, the Multi-factor authentication dialog box appears, displaying one or more methods you can use to verify your login credentials. The number of methods that appear in the dialog box depends on what MFA methods your ESO Suite administrators enabled in the Admin module.

Click graphics
to open them.Information on enabling MFA and specific MFA methods is available in the Admin module online help, in Configure multiple-factor authentication.
Note: If your ESO Suite administrators have disabled MFA ("opted-out"), this dialog does not appear.
-
(If the Multi-factor authentication dialog box appears) Depending on which buttons appear in the dialog box, verify your login in one of the following ways.
 With an authenticator application.
-
Click MFA verification via authenticator app.
The dialog box updates with boxes for entering the numbers of the authentication code, and the ESO Suite sends an authentication code to the authenticator application installed on your device.
-
Open your authenticator application and note the authentication code currently displayed.
-
Enter the authentication code displayed in the authenticator application.
-
Click Log In.
 With a text message (SMS).
-
Click MFA verification via SMS.
The dialog box updates with boxes for entering the numbers of the authentication code, and the ESO Suite sends an authentication code to the phone number recorded in your PM records and identified with MFA codes.
-
Enter the authentication code sent to your MFA-registered phone number.
-
Click Log In.
 With an email message.
-
Click MFA verification via email.
The dialog box updates with boxes for entering the numbers of the authentication code, and the ESO Suite sends an authentication code to your agency or department email address, recorded in your PM records.
-
Enter the authentication code sent to your agency or department email address.
-
Click Log In.
-
-
The ESO Suite landing screen appears.

Click graphics
to open them.Note: If MFA is enabled, you can access and manage your MFA options through the PM module, on the Settings > Account page, as described in Manage a user account. If your agency or department has enabled MFA but has not purchased the full-featured version of the PM module, you can access your own MFA settings by clicking Change my Multi-Factor Authentication settings on the landing screen, then using the Settings > Account page that appears. If your agency has not enabled MFA, the Change my Multi-Factor Authentication settings link does not appear on the landing screen.
-
-
On the top side of the home screen, click PM.
Tip: If your screen or browser window is too narrow to display all your agency's ESO Suite module icons, an options icon appears on the right side of the icon bar. If you click the options icon, a menu appears containing additional module icons.
A list of all the personnel in the PM module appears, displayed in a grid format.
PM (full version) PM Basic Note: If you can access the full-featured PM module, you can view all your own information in it. The amount of information you can edit in the PM module depends on what roles and permissions your ESO Suite administrator assigned to your user account.
Information on user accounts, roles, and permissions is available in Manage a user account.
-
-
(If you have not done so already) Open the record of the person you want to work with, as described in Display, filter, and export personnel lists.
The personnel record opens and displays the page relevant to the list you were working with.
PM (full version) PM Basic -
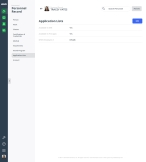
In the left pane, click Application Lists.
The Applications Lists page appears.
-
On the right side of the Application Lists section, click Edit.
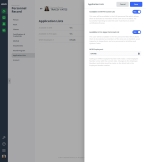
The Application Lists dialog box appears on the right.
-
For Available in EHR Personnel List and Available in Fire Apps Personnel List, drag the button to the Yes or No position to indicate whether or not the person is available for selection as a crew member in an EHR and/or fire incident record.
For Available in Fire Apps Personnel List, if you dragged the slider to Yes, the NFIRS Employee # field appears.This is a required field for incident records.
-
(If necessary) In NFIRS Employee #, type the NFIRS employee number for the person.
If you had entered the NFIRS employee number when initially creating the individual's personnel record, or later on the Work tab of the individual's personnel record, that number automatically populates in NFIRS Employee # here. If you enter or change the NFIRS employee number in NFIRS Employee # now, the number on the Work tab updates to reflect the change.
Note:
-
The NFIRS Employee Number is required if the person is identified as a person who can respond to a fire incident, or who is available in any of the fire modules. This number is used for reporting to FEMA for NFIRS.
-
The NFIRS number is assigned by your agency or department, and can be no more than nine characters long.
-
-
For Enabled for Learning Academy, drag the button to the Yes or No position to indicate whether or not the person can log in to EMS1 Academy or FireRescue1 Academy, to work on training courses there.
Note: This option appears only if your agency or department has purchased integration with Lexipol's EMS1 Academy or FireRescue1 Academy. Enabling it allows the EMS1 and/or FireRescue1 Academy to send completed-class information back to the PM module.
For information on integrating with these Lexipol Academies, contact your ESO Suite sales representative.
- Click Save.


