Update custom dashboards
ESO Insights is the next-generation data analytics and visualization platform for the ESO Suite. As such, ESO's software developers work tirelessly to improve usability and performance, and to stay in compliance with national schema standards defined by organizations such as NEMSIS and NFIRS. In all ESO-provided dashboards, these improvements are managed seamlessly and you will detect no changes other than improved usability and performance.
|
Note: For fields that have been moved, renamed, or deleted in the database to comply with schema standards, error messages may appear in custom dashboards. Custom dashboards are copies of ESO dashboards that you have modified to meet your agency's needs, or dashboards you have created completely from a new, blank dashboard. You need to update your dashboards to resolve these errors, using the directions below. |
-
Check any error descriptions in the dashboard for clues as to what fields are no longer working as expected.
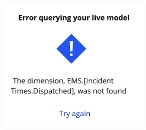
Example: The error message below indicates that in the
EMSdata model, in theIncident Timestable, theDispatchedfield can not be found.This error indicates that the field has been moved or deleted. In this particular case, the field was moved to a new table in the data model, and any filters, calculations and widgets that reference this field will have errors when they can not find it.
-
 Update dashboard filters.
-
Check the Filters pane on the right side of the screen, to see if the dashboard uses a filter that includes an affected field.
Example: A dashboard filter references to field
Dispatched, and because the field was moved to a different table, the filter can no longer find the field.To resolve the error, you need to delete the filter with the affected field, and then add a new filter referencing the field from its new table.
-
In the lower left corner of the filter using the affected field, click the trash can (delete) icon.
The filter disappears from the Filters pane, and the data in the main dashboard pane updates to display information without the filter applied
-
In the upper right corner of the pane, click the click the plus (
 ) icon.
 The Add Filter <data source> dialog box appears, displaying the list of tables and fields available from that data source. The icon to the left of a field name indicates the type value that field contains (alphabetic characters, numbers, dates, and so forth).
-
In Type to search for fields, begin typing characters in the name of the field you want to find.
As you type, the list of fields reduces to only those whose names still match the characters you are typing.
-
Scroll down to find the table containing the field you want to filter with, then click that field.
The Add Filter <data source> dialog box appears, listing every value for that field, in that table. By default, every value is selected and at the bottom of the dialog box, the blue Include all value appears.
-
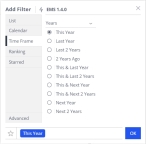
In the left pane, click the data category you want to use to find values for this field.
Example: For the
Dispatchedfield, you would click Time Frame to find values that correspond to a time data type. -
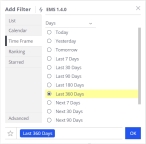
In the right pane, clear and select values as needed, until only the values you want to search for in that field remain selected.
Example: For the
Dispatchedfield, you would choose Days, then in the updated right pane, you would choose Last 360 Days. -
Click OK.
The dialog box closes, the filter appears in the Filters pane, referencing the field correctly, and he main pane of the dashboard updates accordingly. Because this is a dashboard filter, this change can affect all the widgets on the dashboard.
-
-
 Update widgets in the dashboard.
Some widgets may not work after updating the dashboard filters, because those widgets reference the affected field directly.
-
In the upper right corner of the widget with the error, click the edit (
 ) icon.
The widget opens for editing, and the fields referenced by the widget appear in the left pane.
-
Review the fields in the left pane and check to see if any of them using the affected field.
Example: In the line chart widget on a dashboard, the X-Axis section of the chart references the
Dispatchedfield, which is affected by the schema update. -
In the lower left corner of the field, click the delete (trash can) icon.
The ESO Insights module removes the field from the section.
-
In the left pane, in the section you want to add a field to, click the plus icon (
 ).
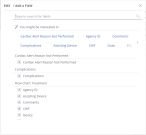
).The <data source> / Add a Field dialog box appears, displaying the list of tables and fields available from that data source. The icon to the left of a field name indicates the type value that field contains (alphabetic characters, numbers, dates, and so forth).
-
In Type to search for fields, begin typing characters in the name of the field you want to find.
As you type, the list of fields reduces to only those whose names still match the characters you are typing.
Example: In the field, type
Dispatched. The table containing the field and the listing of the field itself appears. -
Click the name of a field you want to display in the widget.
The field appears in the left pane, under the section you added it to, and the center pane may update to include values from the field.
-
Configure the field to display the type of values you want to display in the widget.
Example: For the
Dispatchedfield you added to the X-Axis section, in the upper left corner of the field listing, you would click the time selector icon and choose Months.The widget in the center pane updates to display data from the field, of the data type you chose.
-
-
Repeat the steps above for each dashboard and widget displaying errors.


