Use positive identification with medication
Positive identification is a method of identifying an individual through evidence, proving that they are who they say they are. A positive identification system can prevent the use of a single identity by several people.
ESO provides an optional positive identification process using security questions to confirm who administers or disposes of a drug. Use of this process can decrease paper usage, enhance accountability, and increase medication security.
|
Note:
|
-
 (If you have not done so already) Access the EHR module in the ESO Suite.
-
Do one of the following.
-
(If you are already working in the ESO Suite) Click the Home icon in the upper left corner of the screen.
-
 (If you have not yet logged in) Log in to the ESO Suite.
-
In a web browser, go to https://www.esosuite.net/EsoSuite.
The ESO Suite login screen appears.
-
Enter your user name, password, and agency name, then click Let's Go.
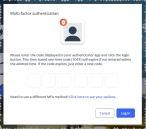
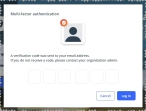
If MFA is enabled, the Multi-factor authentication dialog box appears, displaying one or more methods you can use to verify your login credentials. The number of methods that appear in the dialog box depends on what MFA methods your ESO Suite administrators enabled in the Admin module.

Click graphics
to open them.Information on enabling MFA and specific MFA methods is available in the Admin module online help, in Configure multiple-factor authentication.
Note: If your ESO Suite administrators have disabled MFA ("opted-out"), this dialog does not appear.
-
(If the Multi-factor authentication dialog box appears) Depending on which buttons appear in the dialog box, verify your login in one of the following ways.
 With an authenticator application.
-
Click MFA verification via authenticator app.
The dialog box updates with boxes for entering the numbers of the authentication code, and the ESO Suite sends an authentication code to the authenticator application installed on your device.
-
Open your authenticator application and note the authentication code currently displayed.
-
Enter the authentication code displayed in the authenticator application.
-
Click Log In.
 With a text message (SMS).
-
Click MFA verification via SMS.
The dialog box updates with boxes for entering the numbers of the authentication code, and the ESO Suite sends an authentication code to the phone number recorded in your PM records and identified with MFA codes.
-
Enter the authentication code sent to your MFA-registered phone number.
-
Click Log In.
 With an email message.
-
Click MFA verification via email.
The dialog box updates with boxes for entering the numbers of the authentication code, and the ESO Suite sends an authentication code to your agency or department email address, recorded in your PM records.
-
Enter the authentication code sent to your agency or department email address.
-
Click Log In.
-
-
The ESO Suite landing screen appears.

Click graphics
to open them.Note: If MFA is enabled, you can access and manage your MFA options through the PM module, on the Settings > Account page, as described in Manage a user account. If your agency or department has enabled MFA but has not purchased the full-featured version of the PM module, you can access your own MFA settings by clicking Change my Multi-Factor Authentication settings on the landing screen, then using the Settings > Account page that appears. If your agency has not enabled MFA, the Change my Multi-Factor Authentication settings link does not appear on the landing screen.
-
-
On the top side of the home screen, click EHR.
Tip: If your screen or browser window is too narrow to display all your agency's ESO Suite module icons, an options icon appears on the right side of the icon bar. If you click the options icon, a menu appears containing additional module icons.
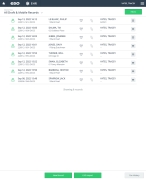
The EHR screen appears, displaying a list of patient records in the EHR module. The most-recent records appear at the top of the list.
Different record status icons can appear in the list.
Icon Status Unlocked/DraftThe patient record exists in the ESO Suite database, and all crew members listed in the patient record may edit all fields in the record. ESO Suite administrators and personnel with security roles of either
EHR SupervisororEHR Managercan edit non-clinical fields.MobileThe patient record exists on the mobile device, and has not been synchronized with the ESO Suite database. ESO Suite administrators, personnel with security roles of either
EHR SupervisororEHR Manager, and all crew members listed in the patient record can only access a print view of the record.Once the Mobile record synchronizes with the ESO Suite database. the record reflects its current status.
LockedThe patient record exists in the ESO Suite database, and is locked. Only non-clinical fields can be edited by crew members listed in the patient record, ESO Suite administrators and personnel with security roles of either
EHR SupervisororEHR Manager.
-
-
 (If you have not done so already) Set up your positive identification account.
-
In the upper right corner of the screen, click Positive Identification.
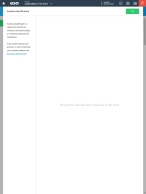
The Positive Identification dialog box appears.
-
In the left pane, click esosuite.net/positiveid.
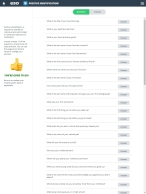
In a separate browser tab, the list of positive identification security questions appears, set to either the Questions or Answers list.
-
 Answer at least 15 of the security questions.
-
(If it is not already selected) At the top of the screen, click Questions.
The screen updates to display the list of security questions that do not yet have answers.
-
Scan the list of questions and identify 15 of them you want use as security questions for verifying your identity.
Tip: Choose questions you can easily remember the answers to.
-
For each of the security questions you want to use, to the right of that question, click Answer.
The Answer the Following Question dialog box appears.
-
In the field, type your answer to the security question, then click Save.
That question's listing disappears from the Questions list, and moves to the Answers list.
-
Repeat the previous two steps as many time as necessary to answer at least 15 questions.
-
-
 (If necessary) Change the answers to any of the security questions.
-
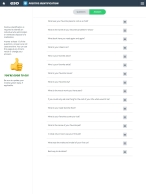
(If it is not already selected) At the top of the screen, click Answers.
The screen updates to display the list of security questions you have provided answers to.
-
For the security question you want to change the answer to, click the menu icon to the right of that questions listing, and choose Edit from the menu that appears.
The Answer the Following Question dialog box appears.
-
In the field, type your answer to the security question, then click Save.
-
Repeat the previous two steps as many time as necessary to change the answers to any of the security questions.
In the field, type your answer to the security question, then click Save.
-
-
 (If necessary) Delete the answer to any of the security questions.
-
(If it is not already selected) At the top of the screen, click Answers.
The screen updates to display the list of security questions you have provided answers to.
-
For the security question you want to delete the answer to, click the menu icon to the right of that questions listing, and choose Remove answer from the menu that appears.
That question's listing disappears from the Answers list, and moves back to the Questions list.
-
In the field, type your answer to the security question, then click Save.
-
Repeat the previous two steps as many time as necessary to delete the answer to any of the security questions.
Note: If you delete the answer to too many security questions, an alert appears in the left pane, letting you know how many security questions you need to answer from the Questions list again to reach at least 15 answers.
-
-
-
Depending on the indicator to the left of Positive Identification, do one of the following.
 A gray vertical line appears.
No positive identification is required for any medications administered so far, or the positive identification account is not set up yet.
-
(If the account is not set up) Follow the directions under step 2, (If you have not done so already) Set up your positive identification account.
 A red exclamation point appears.
Positive identification is required, and medication has been administered and/or disposed of.
-
Click Positive Identification.
The Positive Identification dialog box appears, listing any medication treatment the provider needs to confirm.
-
To the right of the provider's name, click Confirm.
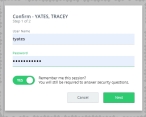
Depending on whether or not the provider has set up their positive identification account in the ESO Suite, either the Confirm dialog box appears, or a dialog box prompting them to set up the account or giving them the option to sign a printed PCR appears.
-
Confirm the provider's identity.
 A positive ID account already exists.
-
Verify that the user name and password populated in the Confirm dialog box are correct.
-
(Optional) For Remember me this session, move the slider from Yes to the left, until No appears, to skip the login credentials screen the next time for subsequent incidents that occur while the primary user remains logged in.
-
Click Next.
The EHR module randomly selects and displays two of the security questions you answered when you set up your positive identification account.
-
Type the answers to each question, then click Confirm.
The Positive Identification dialog box reappears, with the Confirm link to the right of the provider's name gone, and a green circle with a check mark appears on the right side of the provider's row.
-
Click OK.
The icon to the left of Positive Identification turns green, to indicate that the provider's identify is confirmed.
 The provider will sign a printed PCR.
-
Click User will sign printed PCR.
The Positive Identification dialog box reappears, with the Confirm link to the right of the provider's name gone, and a green circle with a check mark appears on the right side of the provider's row.
-
Click OK.
The icon to the left of Positive Identification turns green, to indicate that the provider's identify is confirmed.
-
 A green vertical line appears.
Positive identification is confirmed for the documented administered and/or disposed medication(s). No additional action is required.
Note: Modifications to the medications documented on the record may change status color on the icon.
-


