Enable and configure surveys
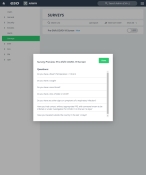
The Admin module provides the ability to activate surveys for your personnel to take at specified intervals. You can configure which personnel take a survey, and how often they can take it.
Example: Coronavirus disease (COVID-19) adversely affects older adults and persons with underlying health conditions or compromised immune conditions. This population is at greater risk for severe illness from this virus. Due to the vulnerability of residents in long-term care facilities and other vulnerable populations, limiting possible exposure to COVID-19 is vital. The Admin module provides a COVID-19 survey, that you can configure to require EMS providers and fire incident responders in your department or agency to take at the beginning of each shift.
Note: You must grant users a role with the User Survey permission, or add the permission to their account, for them to use this feature when they log in to the ESO Suite.
Information on assigning roles and permissions is available in Work with user accounts and Define roles
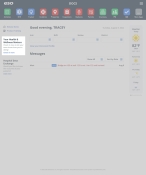
When a survey is activated, when a user logs into the ESO Suite, a message appears on the left side of the screen, with a link to the survey.
|
Click graphics
|
Note: The message and link no longer appears if a survey only needs to taken once, and the user has already taken it.
-
Do one of the following.
-
(If you are already working in the ESO Suite) Click the Home icon in the upper left corner of the screen.
-
 (If you have not yet logged in) Log in to the ESO Suite.
-
In a web browser, go to https://www.esosuite.net/EsoSuite.
The ESO Suite login screen appears.
-
Enter your user name, password, and agency name, then click Let's Go.
If MFA is enabled, the Multi-factor authentication dialog box appears, displaying one or more methods you can use to verify your login credentials. The number of methods that appear in the dialog box depends on what MFA methods your ESO Suite administrators enabled in the Admin module.

Click graphics
to open them.Information on enabling MFA and specific MFA methods is available in the Admin module online help, in Configure multiple-factor authentication.
Note: If your ESO Suite administrators have disabled MFA ("opted-out"), this dialog does not appear.
-
(If the Multi-factor authentication dialog box appears) Depending on which buttons appear in the dialog box, verify your login in one of the following ways.
 With an authenticator application.
-
Click MFA verification via authenticator app.
The dialog box updates with boxes for entering the numbers of the authentication code, and the ESO Suite sends an authentication code to the authenticator application installed on your device.
-
Open your authenticator application and note the authentication code currently displayed.
-
Enter the authentication code displayed in the authenticator application.
-
Click Log In.
 With a text message (SMS).
-
Click MFA verification via SMS.
The dialog box updates with boxes for entering the numbers of the authentication code, and the ESO Suite sends an authentication code to the phone number recorded in your PM records and identified with MFA codes.
-
Enter the authentication code sent to your MFA-registered phone number.
-
Click Log In.
 With an email message.
-
Click MFA verification via email.
The dialog box updates with boxes for entering the numbers of the authentication code, and the ESO Suite sends an authentication code to your agency or department email address, recorded in your PM records.
-
Enter the authentication code sent to your agency or department email address.
-
Click Log In.
-
-
The ESO Suite landing screen appears.

Click graphics
to open them.Note: You can access and manage your MFA options through the PM module, on the Settings > Account page, as described in Manage a user account. If your agency or department has enabled MFA but has not purchased the full-featured version of the PM module, you can access your own MFA settings by clicking Change my Multi-Factor Authentication settings on the landing screen, then using the Settings > Account page that appears. If your agency has not enabled MFA, the Change my Multi-Factor Authentication settings link does not appear on the landing screen.
-
-
On the top side of the home screen, click Admin.
Tip: If your screen or browser window is too narrow to display all your agency's ESO Suite module icons, an options icon appears on the right side of the icon bar. If you click the options icon, a menu appears containing additional module icons.
The Admin screen appears, displaying the Welcome screen.
-
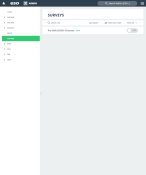
In the left pane, click Surveys.
The Surveys screen appears, listing any surveys provided with ESO Suite.
-
Do any of the following.
 Activate a survey for use.
-
For the survey you want to activate, on the right side of the survey's listing, drag the slider button to the left, until On appears.
The Configure link to the right of the item name appears.
Note: In the upper right corner of the list, if you click View Sort Order, the list still displays deactivated items while you are in the Admin module. In all other ESO Suite modules, deactivated items do not appear in the lists.
 Video: Activate and deactivate a list item
Note: The process for activating and deactivating a list item shown below applies to any list in the ESO Suite.
 Configure a survey.
- (If you have already done so) Activate the survey you want to configure, as described above.
-
To the right any an survey's name, click Configure.
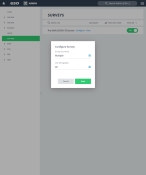
The Configure Survey dialog box appears.
-
For Survey Occurrence, click the field or the list icon to the right of the field, then select the appropriate single option from the menu that appears. to indicate how many times a user can take the survey.
If you choose Once, users can only take the survey once while the survey is enabled. If you disable and re-enable the survey, users can take the survey again. If you choose Multiple, users can take the survey as many times as they wish while the survey is enabled.
-
For User Demographic, click the field or the list icon to the right of the field, then select the appropriate single option from the menu that appears, to indicate who can take the survey.
If you choose All, anyone who logs in to the ESO Suite can take the survey. If you choose any of the other options, only those personnel whose user account employment information correspondingly identifies them as being available in the EHR personnel list or fire Incidents personnel list can take the survey.
-
Click Save.
-


