Synchronize the ESO Suite web and mobile components
In the EHR module, there is both a Web (online) component and a mobile computer (client) installation component. The client component lets a medic work on mobile computer while in offline in the field, to enter data for an incident. When the medic returns to the station and internet access, they can synchronize that data on the client mobile computer with the web (online) component of EHR, and all EHR users with the right permissions can access the incident data.
In the Admin module, you can determine how long patient care records remain on the mobile client computer's database, how long a patient care record can be looked up on the mobile computer, and whether or not the mobile client installation allows automatic software updates from ESO.
-
Do one of the following.
-
(If you are already working in the ESO Suite) Click the Home icon in the upper left corner of the screen.
-
 (If you have not yet logged in) Log in to the ESO Suite.
-
In a web browser, go to https://www.esosuite.net/EsoSuite.
The ESO Suite login screen appears.
-
Enter your user name, password, and agency name, then click Let's Go.
If MFA is enabled, the Multi-factor authentication dialog box appears, displaying one or more methods you can use to verify your login credentials. The number of methods that appear in the dialog box depends on what MFA methods your ESO Suite administrators enabled in the Admin module.

Click graphics
to open them.Information on enabling MFA and specific MFA methods is available in the Admin module online help, in Configure multiple-factor authentication.
Note: If your ESO Suite administrators have disabled MFA ("opted-out"), this dialog does not appear.
-
(If the Multi-factor authentication dialog box appears) Depending on which buttons appear in the dialog box, verify your login in one of the following ways.
 With an authenticator application.
-
Click MFA verification via authenticator app.
The dialog box updates with boxes for entering the numbers of the authentication code, and the ESO Suite sends an authentication code to the authenticator application installed on your device.
-
Open your authenticator application and note the authentication code currently displayed.
-
Enter the authentication code displayed in the authenticator application.
-
Click Log In.
 With a text message (SMS).
-
Click MFA verification via SMS.
The dialog box updates with boxes for entering the numbers of the authentication code, and the ESO Suite sends an authentication code to the phone number recorded in your PM records and identified with MFA codes.
-
Enter the authentication code sent to your MFA-registered phone number.
-
Click Log In.
 With an email message.
-
Click MFA verification via email.
The dialog box updates with boxes for entering the numbers of the authentication code, and the ESO Suite sends an authentication code to your agency or department email address, recorded in your PM records.
-
Enter the authentication code sent to your agency or department email address.
-
Click Log In.
-
-
The ESO Suite landing screen appears.

Click graphics
to open them.Note: You can access and manage your MFA options through the PM module, on the Settings > Account page, as described in Manage a user account. If your agency or department has enabled MFA but has not purchased the full-featured version of the PM module, you can access your own MFA settings by clicking Change my Multi-Factor Authentication settings on the landing screen, then using the Settings > Account page that appears. If your agency has not enabled MFA, the Change my Multi-Factor Authentication settings link does not appear on the landing screen.
-
-
On the top side of the home screen, click Admin.
Tip: If your screen or browser window is too narrow to display all your agency's ESO Suite module icons, an options icon appears on the right side of the icon bar. If you click the options icon, a menu appears containing additional module icons.
The Admin screen appears, displaying the Welcome screen.
-
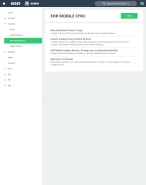
In the left pane, expand Security, then click EHR Mobile Sync.
The EHR Mobile Sync screen appears.
-
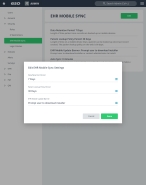
Click Edit.
The EHR Mobile Sync screen appears.
Note: You must fill in all fields indicated as
REQUIREDon this screen. -
For each field in the dialog box, click the field or the list icon to the right of the field, then select the appropriate single option from the menu that appears.
 Data Retention Period
Because each mobile unit has its own database, the data retention period determines how long a record stays in the mobile database before the record is erased. This can prevent or minimize the exposure of PHI if a mobile computer is lost, and then accessed by unauthorized individuals.
If you choose None (0 days), once a record is synchronized to the EHR web component, the record is immediately erased from the mobile database. For all other options, the record stays in the mobile database for the corresponding number of days after synchronization with the web component.
 Patient Lookup Policy Period
The patient lookup period lets you access patient information that was accessed by someone within your agency in the last specified number of days.
In EHR on the mobile computer, this is a valuable time-saver for medics in the field, who may need to quickly retrieve information for “frequent fliers” or HUG (high user group) patients, such as those at nursing homes or the chronically ill. The medic can enter a patient’s last name, date of birth, or social security number, and perform a fast lookup. EHR presents the medic with a list of possible patients matching that criteria, and they can then quickly select the correct one.
Patient data that does not change, such their name and past medical history, address, billing information, and so forth appears. Clinical data from the last visit, such as vitals or procedures, does not appear.
Note: This fast lookup feature is only available to mobile client users, not to personnel using the web component.
 EHR Mobile Update Banner
If you choose Prompt user to download installer, when ESO releases an update to EHR, an upgrade message and link appears on all the mobile client computers, on the mobile unit’s portal dashboard, once the user logs in. The message and link appears as a red banner across the top of the dashboard.
If you choose Prompt to contact administrator, the message and link do not appear.
-
Click Done.
Note: The Auto Sync option, which controls how often incidents and patient care records are synchronized between the web and mobile client components, must be set by a member of ESO technical support. To have this setting changed, contact ESO support.


