Configure IP restrictions
You can limit access to the ESO Suite to only IP addresses within your agency's network, to prevent employees from updating records when they are at home or in a public setting.
Warning: Be sure to finish and save IP restrictions in a timely manner. If you do not save your restriction changes before you are automatically logged out for inactivity, your incomplete restrictions become saved and you could become locked out of the ESO Suite.
- Determine your agency's IP addresses, and which addresses you want to allow access to the ESO Suite.
-
Do one of the following.
-
(If you are already working in the ESO Suite) Click the Home icon in the upper left corner of the screen.
-
 (If you have not yet logged in) Log in to the ESO Suite.
-
In a web browser, go to https://www.esosuite.net/EsoSuite.
The ESO Suite login screen appears.
-
Enter your user name, password, and agency name, then click Let's Go.
If MFA is enabled, the Multi-factor authentication dialog box appears, displaying one or more methods you can use to verify your login credentials. The number of methods that appear in the dialog box depends on what MFA methods your ESO Suite administrators enabled in the Admin module.

Click graphics
to open them.Information on enabling MFA and specific MFA methods is available in the Admin module online help, in Configure multiple-factor authentication.
Note: If your ESO Suite administrators have disabled MFA ("opted-out"), this dialog does not appear.
-
(If the Multi-factor authentication dialog box appears) Depending on which buttons appear in the dialog box, verify your login in one of the following ways.
 With an authenticator application.
-
Click MFA verification via authenticator app.
The dialog box updates with boxes for entering the numbers of the authentication code, and the ESO Suite sends an authentication code to the authenticator application installed on your device.
-
Open your authenticator application and note the authentication code currently displayed.
-
Enter the authentication code displayed in the authenticator application.
-
Click Log In.
 With a text message (SMS).
-
Click MFA verification via SMS.
The dialog box updates with boxes for entering the numbers of the authentication code, and the ESO Suite sends an authentication code to the phone number recorded in your PM records and identified with MFA codes.
-
Enter the authentication code sent to your MFA-registered phone number.
-
Click Log In.
 With an email message.
-
Click MFA verification via email.
The dialog box updates with boxes for entering the numbers of the authentication code, and the ESO Suite sends an authentication code to your agency or department email address, recorded in your PM records.
-
Enter the authentication code sent to your agency or department email address.
-
Click Log In.
-
-
The ESO Suite landing screen appears.

Click graphics
to open them.Note: You can access and manage your MFA options through the PM module, on the Settings > Account page, as described in Manage a user account. If your agency or department has enabled MFA but has not purchased the full-featured version of the PM module, you can access your own MFA settings by clicking Change my Multi-Factor Authentication settings on the landing screen, then using the Settings > Account page that appears. If your agency has not enabled MFA, the Change my Multi-Factor Authentication settings link does not appear on the landing screen.
-
-
On the top side of the home screen, click Admin.
Tip: If your screen or browser window is too narrow to display all your agency's ESO Suite module icons, an options icon appears on the right side of the icon bar. If you click the options icon, a menu appears containing additional module icons.
The Admin screen appears, displaying the Welcome screen.
-
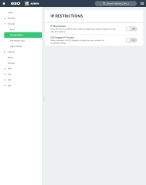
In the left pane, expand Security, then click IP Restrictions.
The IP Restrictions screen appears.
-
Do any of the following.
 Add an IP restriction.
-
For both IP Restrictions and ESO Support IP Access, drag the slider button until On appears.
Caution: If you do not also enable ESO Support IP Access, ESO technical support will not be able to access your system and assist you if the need arises in the future.
The Configure link appears to the right of IP Restrictions.
-
Click Configure.
The IP Whitelist dialog box appears.
-
Click Add.
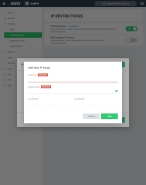
The Add New IP Range dialog box appears.
Note: You must fill in all fields indicated as
REQUIREDon this screen. - In IP Address, enter the first (or only) IP address to allow.
-
For Wildcard Mask, click the field or the list icon to the right of the field, then select the appropriate single option from the menu that appears.
A wild card mask is a mask of bits that indicates which parts of an IP address are available for examination. The mask matches (wildly with a zero) everything in the network portion of an IP address.
The range of IP addresses that will be allowed access appears in First Address and Last Address.
- Click Save.
 Edit an IP restriction.
-
To the right of IP Restrictions, click Configure.
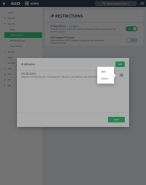
The IP Whitelist dialog box appears, listing any IP restrictions in place.
-
For the restriction you want to change, click the menu icon to the right of the restriction, and choose Edit.
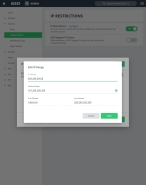
The Edit IP Range dialog box appears.
- Change the IP address range values as needed.
- Click Save.
- Click Done.
 Delete an IP restriction.
-
To the right of IP Restrictions, click Configure.
The IP Whitelist dialog box appears, listing any IP restrictions in place.
-
For the restriction you want to remove, click the menu icon to the right of the restriction, and choose Delete.
The listing for that restriction disappears from the IP Whitelist dialog box.
- Click Done.
 Disable IP restrictions.
-
For IP Restrictions, drag the slider button until Off appears.
The Configure link disappears to the right of IP Restrictions.
-


