Report NFIRS data to FEMA
NFIRS is a voluntary reporting standard that fire departments use to uniformly report on the full range of their activities, from fire to emergency medical services, to severe weather and natural disasters. Fire departments can use NFIRS to track and manage apparatus, personnel and casualty information, document the full range of department activity, and justify budgets with summary and statistical data. Departments can use NFIRS data to focus on current community challenges, predict future issues, and measure program performance.
After responding to an incident, a fire department completes the appropriate NFIRS modules, which describe the nature of the call, the actions firefighters took in response to the call, and the end results, including firefighter and civilian casualties and a property loss estimate.
The fire department submits its all-incident data to the state, tribal or territorial agency responsible for NFIRS data. The agency gathers data from all its participating departments and reports the compiled data to the USFA. The fire department can also submit their data directly to the USFA’s NFIRS national database through import tools designed specifically for this process.
|
Note:
|
-
Do one of the following.
-
(If you are already working in the ESO Suite) Click the Home icon in the upper left corner of the screen.

-
 (If you have not yet logged in) Log in to the ESO Suite.
-
In a web browser, go to https://www.esosuite.net/EsoSuite.
The ESO Suite login screen appears.
-
Enter your user name, password, and agency name, then click Let's Go.
If MFA is enabled, the Multi-factor authentication dialog box appears, displaying one or more methods you can use to verify your login credentials. The number of methods that appear in the dialog box depends on what MFA methods your ESO Suite administrators enabled in the Admin module.

Click graphics
to open them.Information on enabling MFA and specific MFA methods is available in the Admin module online help, in Configure multiple-factor authentication.
Note: If your ESO Suite administrators have disabled MFA ("opted-out"), this dialog does not appear.
-
(If the Multi-factor authentication dialog box appears) Depending on which buttons appear in the dialog box, verify your login in one of the following ways.
With an authenticator application.
-
Click MFA verification via authenticator app.
The dialog box updates with boxes for entering the numbers of the authentication code, and the ESO Suite sends an authentication code to the authenticator application installed on your device.

-
Open your authenticator application and note the authentication code currently displayed.
-
Enter the authentication code displayed in the authenticator application.
-
Click Log In.
With a text message (SMS).
-
Click MFA verification via SMS.
The dialog box updates with boxes for entering the numbers of the authentication code, and the ESO Suite sends an authentication code to the phone number recorded in your PM records and identified with MFA codes.

-
Enter the authentication code sent to your MFA-registered phone number.
-
Click Log In.
With an email message.
-
Click MFA verification via email.
The dialog box updates with boxes for entering the numbers of the authentication code, and the ESO Suite sends an authentication code to your agency or department email address, recorded in your PM records.

-
Enter the authentication code sent to your agency or department email address.
-
Click Log In.
-
-
The ESO Suite landing screen appears.

Click graphics
to open them.Note: You can access and manage your MFA options through the PM module, on the Settings > Account page, as described in Manage a user account. If your agency or department has enabled MFA but has not purchased the full-featured version of the PM module, you can access your own MFA settings by clicking Change my Multi-Factor Authentication settings on the landing screen, then using the Settings > Account page that appears. If your agency has not enabled MFA, the Change my Multi-Factor Authentication settings link does not appear on the landing screen.

-
-
On the top side of the home screen, click Admin.
Tip: If your screen or browser window is too narrow to display all your agency's ESO Suite module icons, an options icon appears on the right side of the icon bar. If you click the options icon, a menu appears containing additional module icons.

The Admin screen appears, displaying the Welcome screen.

-
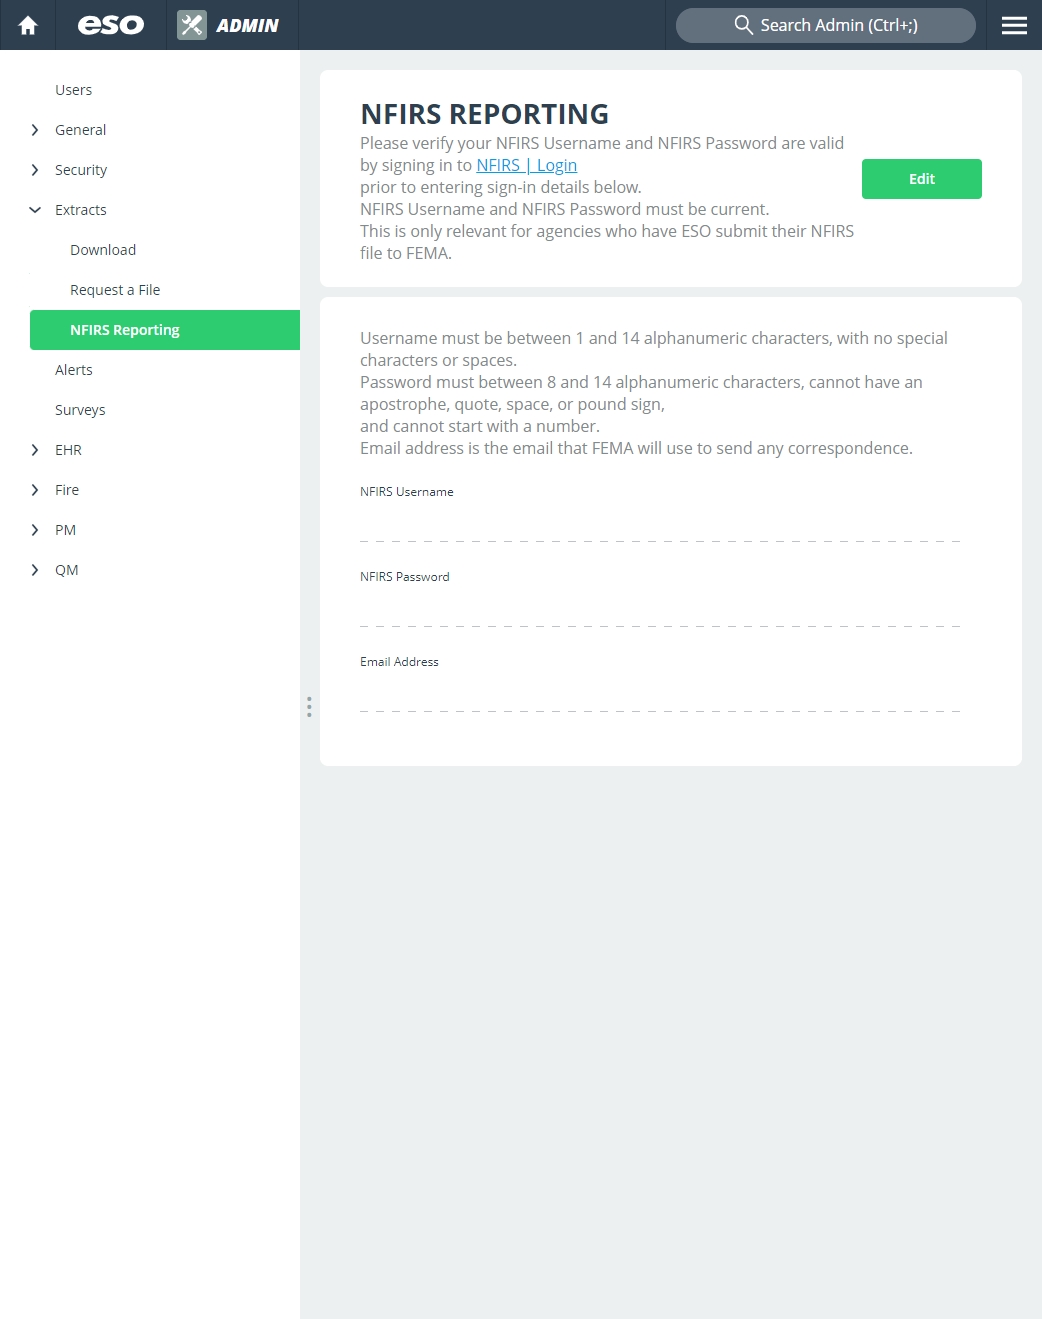
In the left pane, expand Extracts, then click NFIRS Reporting.
The NFIRS Reporting screen appears.
-
In the upper right corner of the screen, click Edit.
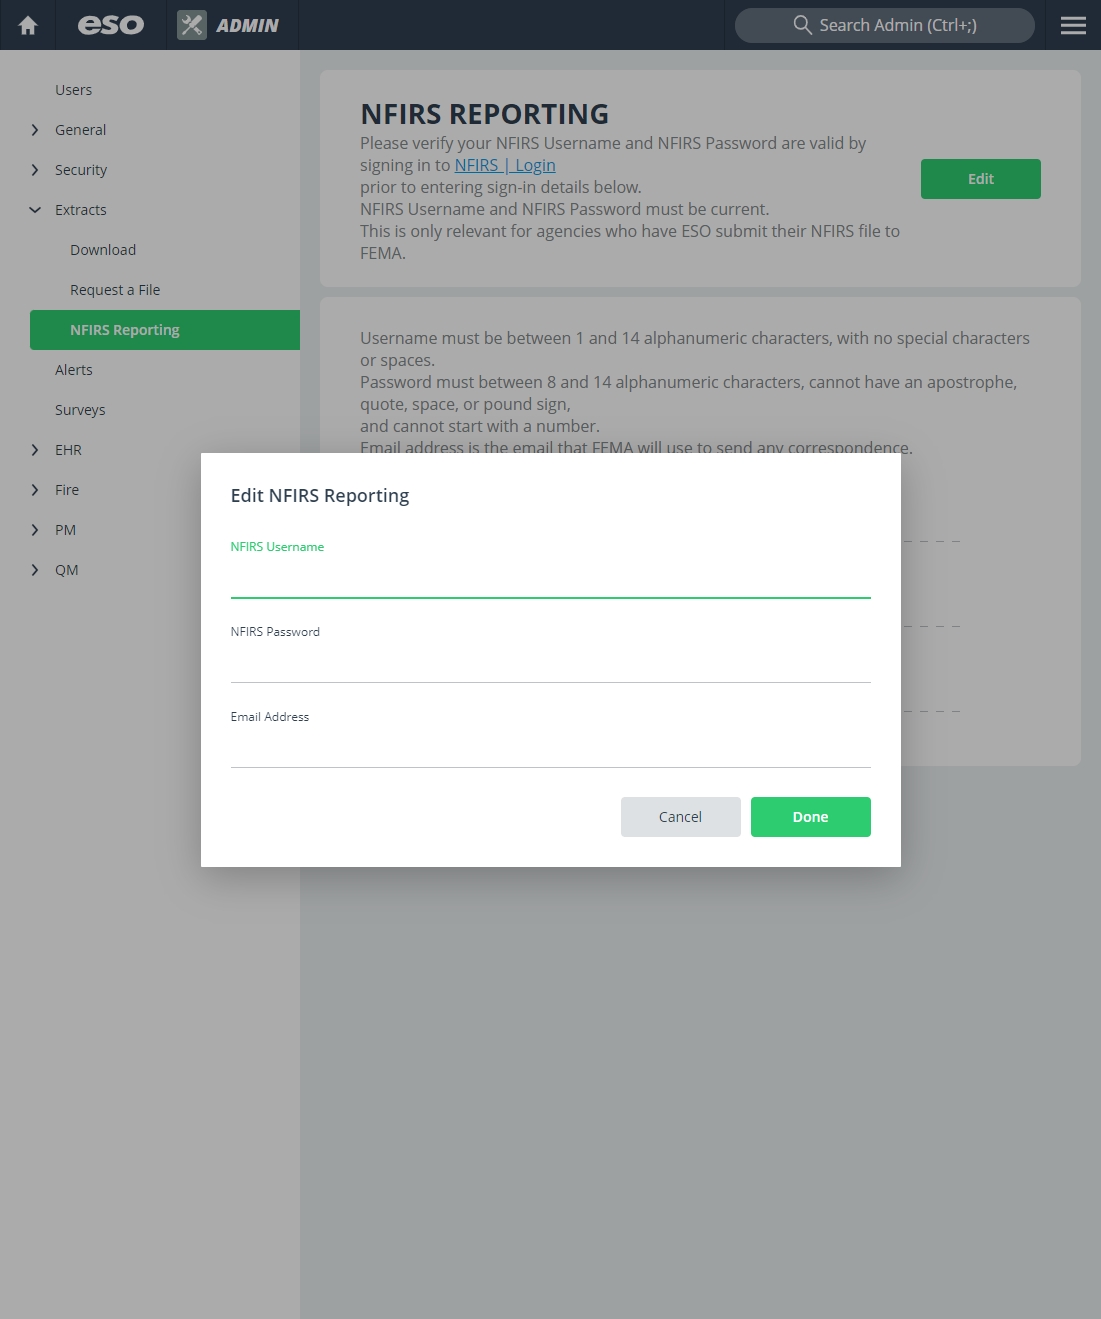
The Edit NFIRS Reporting dialog box appears.

-
In NFIRS Username and NFIRS Password, type your agency's NFIRS login credentials.
-
In Email Address, type the email address your agency uses to send NFIRS data files to FEMA.
-
Click Done.